Understanding how to use a rifle scope correctly is one of the most important skills for anyone interested in hunting, sport shooting, or precision rifle work. A scope is more than just a magnified lens—it is a precision tool that directly influences accuracy, consistency, and ethical shot placement. When used correctly, it allows shooters to identify targets clearly and make more controlled, confident shots at varying distances.
However, many beginners struggle with basic scope usage. Common issues such as improper zeroing, incorrect eye relief, and poorly adjusted turrets often lead to frustration and inconsistent results. These mistakes can significantly reduce accuracy, even with high-quality equipment.
This guide will break down everything you need to know about how to shoot a rifle with a scope, starting from the fundamentals. You will learn how a scope works, its key components, and why proper setup is essential before taking your first shot.
Understanding the Basics of a Rifle Scope
Before learning advanced shooting techniques, it is essential to understand how a rifle scope functions and why each part matters. A scope is designed to improve visual clarity and provide a precise aiming reference, but it only performs well when properly configured and understood. Many accuracy issues come not from the rifle itself, but from misunderstandings about the scope system.
Main Components of a Rifle Scope
Every rifle scope is built around a few essential components that work together to deliver a clear and accurate sight picture. The first is the objective lens, located at the front of the scope. This lens gathers light and determines how bright and clear your image appears. A larger objective lens generally allows more light transmission, which improves visibility in low-light conditions such as early morning or dusk hunting.
The eyepiece is located at the rear of the scope and is where the shooter looks through. It often includes a diopter adjustment that helps sharpen the reticle for individual eyesight differences. Proper adjustment here ensures the crosshair appears crisp and well-defined.
At the center of the scope is the reticle, also known as the crosshair. This is your primary aiming reference. Reticles come in different styles—simple crosshairs, duplex patterns, or more advanced ballistic grids. Regardless of design, the reticle serves as the fixed point you align with your target to guide bullet placement.
Finally, the turret controls allow for adjustments in elevation (up and down) and windage (left and right). These controls are essential for zeroing the rifle and compensating for distance or environmental conditions. Each click of a turret makes a small adjustment to the point of impact, allowing for precise calibration.
When all these components work together correctly, the shooter gains a highly accurate and repeatable aiming system. However, if even one element is misaligned or poorly adjusted, accuracy will suffer regardless of skill level.
How a Rifle Scope Works
A rifle scope functions by using a combination of magnification and light transmission to create a clear, enlarged image of the target. Magnification allows the shooter to see distant objects in greater detail, which is especially important in hunting and long-range shooting scenarios. For example, a 4x magnification makes an object appear four times closer than it actually is.
Light transmission plays an equally important role. A well-designed scope collects and transmits light efficiently, ensuring the image remains bright and sharp even in low-light conditions. This is why higher-quality optics often perform better at dawn or dusk compared to cheaper alternatives.
The reticle is aligned within this magnified image to guide aiming. When you look through the scope, you are essentially superimposing a fixed aiming reference over a distant target. This alignment allows the shooter to control where the bullet will travel in relation to the point of aim.
A key concept to understand is the difference between point of aim and point of impact. The point of aim is where the reticle is placed on the target. The point of impact is where the bullet actually lands. In a properly zeroed rifle, these two points align at a specific distance. If they do not align, adjustments must be made using the scope turrets.
Understanding this relationship is fundamental when learning how to shoot a rifle with a scope, as it directly affects accuracy and consistency.
Importance of Proper Scope Setup
Proper scope setup is the foundation of accurate shooting. Even the best rifle and ammunition will perform poorly if the scope is not correctly mounted and aligned. One of the most critical factors is mounting stability. The scope must be securely attached using properly fitted rings and mounts. Any movement or looseness will cause shifts in point of impact, especially during recoil.
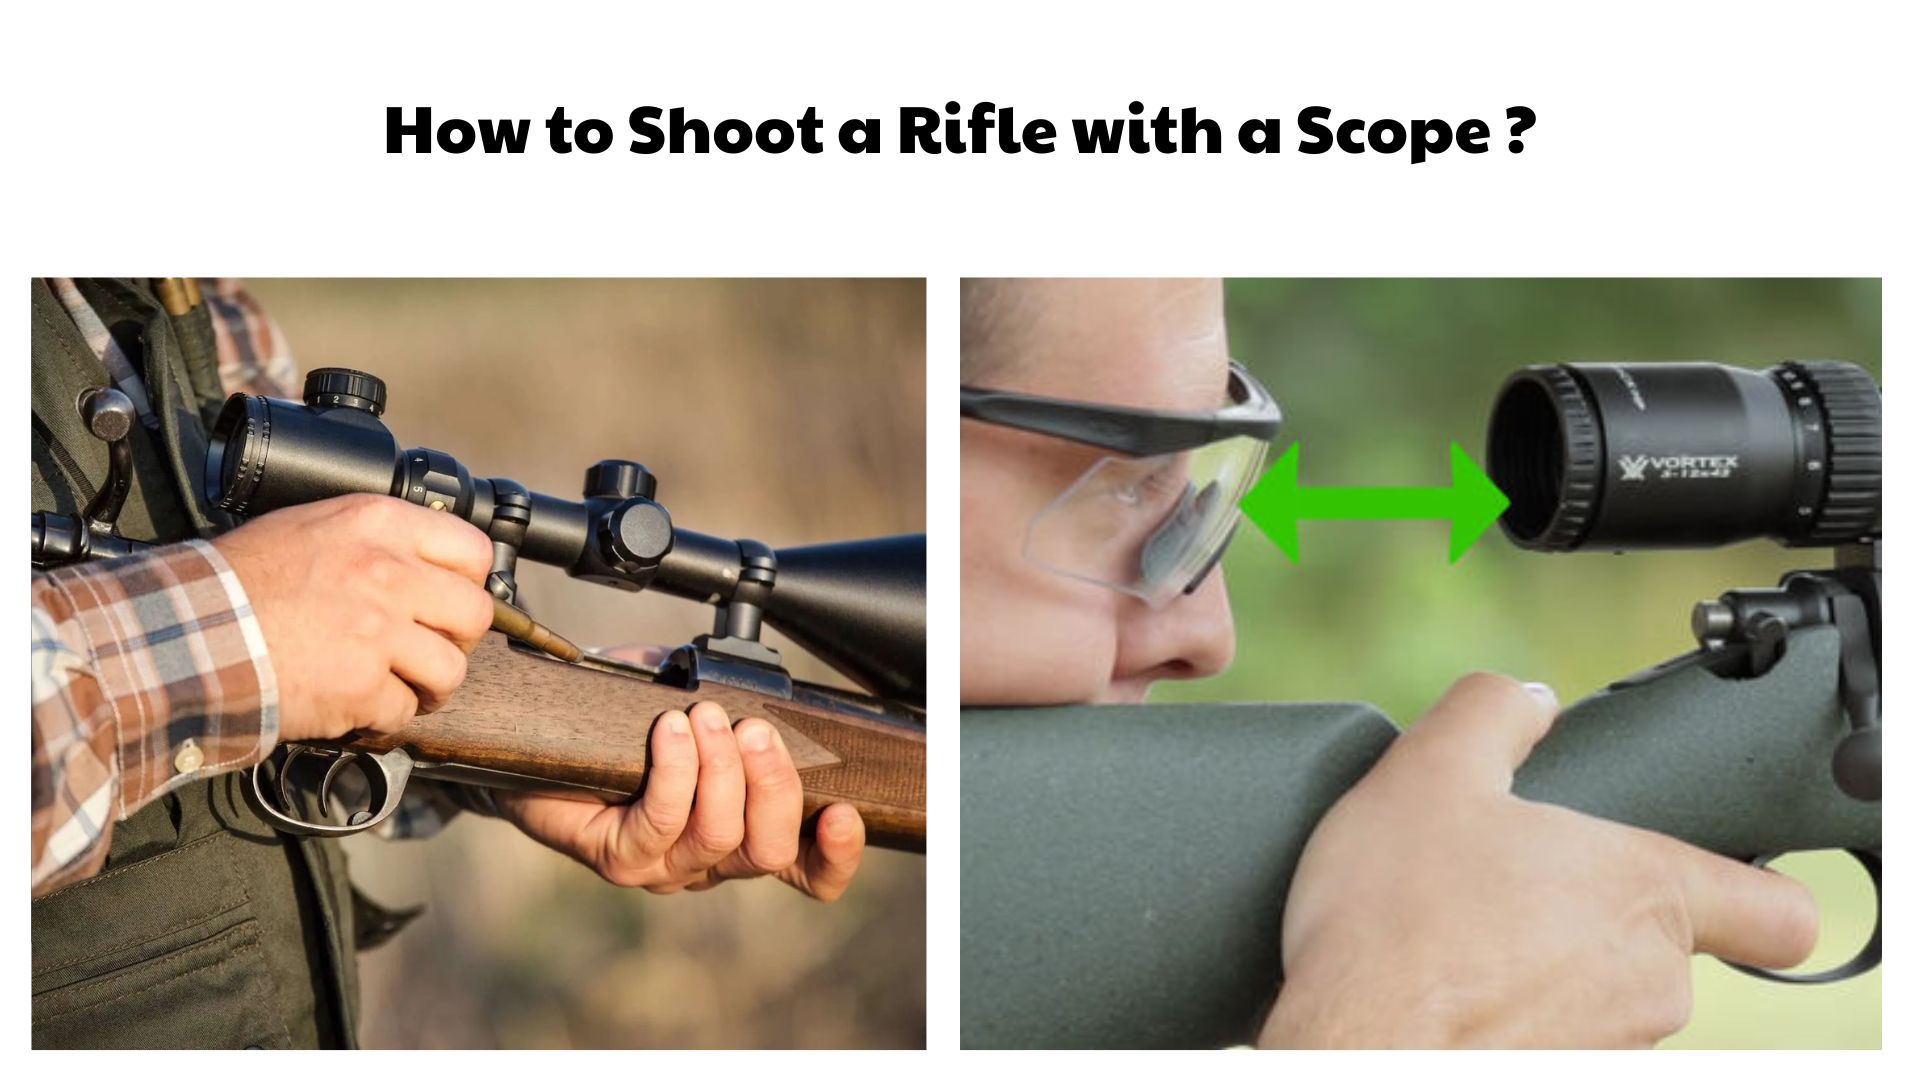
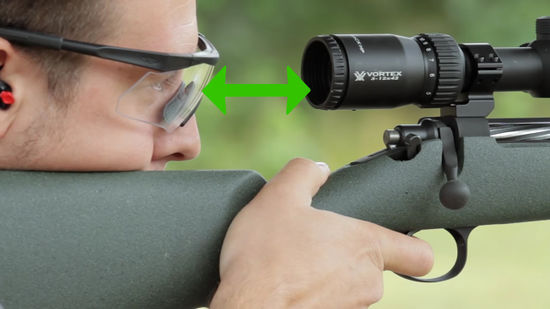
Eye relief is another essential consideration. This refers to the distance between your eye and the scope’s eyepiece. If the scope is too close, recoil can cause injury or discomfort. If it is too far, you may experience a narrowed field of view or “scope shadow,” where the image appears partially blocked. Correct eye relief ensures a full, clear sight picture without strain.
Field of view is also influenced by eye position and scope settings. A properly positioned scope allows you to quickly acquire targets while maintaining awareness of your surroundings. This is especially important in hunting scenarios where quick reaction time matters.
Finally, scope alignment must be checked before shooting. A misaligned scope can cause horizontal or vertical deviations that cannot be corrected through simple aiming adjustments. Ensuring that the reticle is level with the rifle and properly centered prevents long-term accuracy issues.
When these setup principles are followed correctly, the shooter creates a stable and reliable platform for consistent accuracy. This is the essential starting point for mastering how to shoot a rifle with a scope effectively and safely.
How to Mount and Set Up a Rifle Scope
Mounting a rifle scope correctly is one of the most important steps in building an accurate shooting system. Even high-quality optics will perform poorly if they are improperly installed or misaligned. A stable, well-positioned scope ensures that every adjustment you make later—whether for wind, distance, or elevation—produces consistent and predictable results. This section breaks down the setup process in a clear and practical way so you can avoid the most common beginner mistakes.
Choosing the Right Mounting System
The first step in setting up a rifle scope is selecting a compatible mounting system. Most modern rifles use either Picatinny or Weaver rail systems. While they may look similar, there are subtle differences that matter when choosing accessories and scope rings.
Picatinny rails are more standardized and widely used in tactical and modern sporting rifles. They feature evenly spaced slots that allow for precise and repeatable mounting positions. Weaver rails, on the other hand, are slightly older and may not always support the same level of compatibility with modern accessories.
Once the rail system is identified, selecting the correct scope rings becomes essential. Scope rings must match both the rail system and the diameter of the scope tube. Common tube sizes include 1 inch and 30mm. Using mismatched rings can lead to instability, misalignment, or even damage to the scope under recoil.
A stable mounting system is the foundation of accuracy. Without it, even perfect shooting technique will not produce consistent results.
Correct Scope Positioning
Once the mounting system is in place, proper scope positioning becomes the next priority. One of the most important factors is eye relief, which is the distance between your eye and the scope’s eyepiece. Correct eye relief ensures a full, clear image while preventing discomfort or injury caused by recoil.
To set eye relief correctly, shoulder the rifle in a natural shooting position and adjust the scope forward or backward until you see a full field of view without black edges or “scope shadow.” This position should feel comfortable and repeatable every time you raise the rifle.
Another critical step is leveling the scope. A scope that is slightly tilted can cause significant accuracy issues at longer distances. This condition is often referred to as “canting.” Even a small tilt can result in shots drifting left or right as distance increases.
To prevent this, shooters use leveling tools or visual alignment methods to ensure the reticle is perfectly vertical and aligned with the rifle. Proper leveling ensures that elevation and windage adjustments work exactly as intended.
Tightening and Securing the Scope
After positioning and leveling, the scope must be securely tightened. Scope rings should be tightened evenly using proper torque specifications recommended by the manufacturer. This ensures consistent pressure without damaging the scope tube.
Over-tightening is a common mistake among beginners. Applying excessive force can distort the scope tube, affect internal optics, or create stress points that reduce long-term durability. Under-tightening, on the other hand, can allow the scope to shift during recoil, resulting in inconsistent accuracy.
The ideal approach is to tighten screws gradually and evenly, alternating between opposite sides of the ring to maintain balance. Once secured, the scope should feel completely stable with no movement when lightly handled.
How to Sight in (Zero) a Rifle Scope
Zeroing a rifle scope is the process of aligning the point of aim (where you are aiming) with the point of impact (where the bullet actually hits) at a specific distance. This step is essential for accuracy and is a core part of learning how to shoot a rifle with a scope effectively. Without a proper zero, even the best shooting fundamentals will not produce reliable results.
What “Zeroing” Means
Zeroing means adjusting your scope so that the reticle matches the bullet’s impact point at a chosen distance, such as 50 or 100 yards. This creates a reference point for all future shots. Once zeroed, the shooter can confidently aim at targets within that range and expect consistent results.
Different shooting applications may require different zero distances. Hunters, for example, often choose distances that match typical engagement ranges in their environment. The key is consistency and repeatability.
Bore Sighting Process
Bore sighting is an initial alignment technique used before live firing. It involves visually aligning the rifle barrel with a target and adjusting the scope to match that alignment. This step does not replace live zeroing but helps reduce the number of shots needed to achieve it.
By using bore sighting, shooters can save ammunition and reduce frustration during the initial setup phase. It provides a starting point that brings the first shots closer to the target center.
Shooting and Adjusting the Scope
After bore sighting, live firing begins. The shooter fires a group of shots at a target to determine where the bullets are actually landing in relation to the point of aim. This grouping is essential for making accurate adjustments.
Adjustments are made using the scope’s windage and elevation turrets. Windage controls horizontal movement (left and right), while elevation controls vertical movement (up and down). Each click on the turret corresponds to a small shift in point of impact, typically measured in MOA or MRAD depending on the scope system.
It is important to make small, controlled adjustments rather than large corrections. Precision comes from gradual refinement, not sudden changes. After adjusting, another group of shots is fired to verify improvement.
Refining and Confirming Zero
Once initial adjustments bring the group close to the center, the next step is refinement. This involves repeating shot groups to ensure consistency. A proper zero is not based on a single shot but on repeated, stable patterns.
After several consistent groups, the shooter performs a final confirmation at the chosen distance, such as 50 or 100 yards. If the point of impact consistently matches the point of aim, the rifle is considered properly zeroed.
At this stage, the scope is ready for real-world use. Whether for hunting, sport shooting, or practice, a correctly zeroed rifle provides the foundation for accurate and confident shooting.
How to Aim Using a Rifle Scope
Learning how to aim correctly with a rifle scope is where all the earlier setup work starts to come together. Even if your scope is perfectly mounted and zeroed, poor aiming technique will still lead to inconsistent shots. Aiming is not just about placing the crosshair on the target—it involves proper body positioning, eye alignment, and controlled focus. When done correctly, it creates a stable and repeatable shooting process that significantly improves accuracy.
Proper Eye Alignment
Eye alignment is one of the most important fundamentals when learning how to shoot a rifle with a scope. It starts with eye relief, which is the distance between your eye and the scope’s eyepiece. If your eye is too close or too far, the sight picture becomes distorted, often showing a dark shadow or “scope ring” around the image.
A correct eye relief allows you to see a full, clear field of view without strain. This position should feel natural when you shoulder the rifle. You should not need to stretch your neck forward or pull your head back unnaturally. Comfort and consistency are key here.
Another important factor is cheek weld. This refers to how your cheek rests on the rifle’s stock. A consistent cheek weld ensures that your eye always returns to the same position behind the scope. This consistency reduces variation between shots and improves long-term accuracy.
When eye alignment is incorrect, shooters often experience scope shadowing—dark edges or partial images in the scope view. This usually indicates that the eye is not centered properly. Adjusting your stance or scope position can eliminate this issue.
In practical shooting, proper eye alignment becomes automatic with practice. The goal is to build a repeatable shooting position where your eye naturally aligns with the scope every time you shoulder the rifle.
Focusing the Reticle
Before aiming at any target, the reticle must be properly focused. This is done using the diopter adjustment located near the eyepiece of most rifle scopes. The purpose of this adjustment is to match the reticle focus to your individual eyesight.
A correctly focused reticle should appear sharp and clearly defined as soon as you look through the scope. If it appears blurry or slightly out of focus, accuracy will suffer because your brain will struggle to distinguish precise aiming points.
To adjust the diopter, point the scope at a plain, bright background such as the sky or a light-colored wall. Look through the scope and adjust the diopter until the reticle appears instantly sharp without needing to strain your eyes. This adjustment should be done before focusing on any target.
Once set correctly, the reticle should remain crisp every time you use the scope. It is important not to repeatedly adjust this setting unless your eyesight changes significantly or someone else uses the rifle.
A sharp reticle improves confidence and precision, especially when aiming at small or distant targets where fine detail matters.
Target Acquisition Technique
Target acquisition is the process of locating and aligning your rifle scope with the intended target. This step requires smooth movement, controlled breathing, and visual focus. Rushing this process often leads to overshooting the target or losing sight alignment.
A good technique begins with bringing the rifle up to your natural shooting position and slowly guiding the reticle toward the target. Instead of forcing the rifle into position, allow your body to naturally align with the target. This reduces tension and improves stability.
Once the target is in the field of view, center it within the reticle. At this stage, small adjustments are made using body movement rather than excessive arm or wrist corrections. Stability is more important than speed.
Shooters often debate whether to use one eye or both eyes open. Both methods are valid and depend on personal preference and experience level. Using both eyes open allows for better situational awareness and faster target tracking, especially in hunting scenarios. However, using one eye closed can help beginners focus more clearly on the reticle and target alignment.
The key is consistency. Once you choose a method, practice it until it becomes natural. Inconsistent eye usage can lead to errors in alignment and reduced accuracy.
Understanding Bullet Drop and Distance Compensation
One of the most important concepts in rifle shooting is understanding how bullets behave over distance. Many beginners assume bullets travel in a straight line, but in reality, they follow a curved path influenced by gravity, air resistance, and velocity. This concept is essential for accurate long-range shooting and is a core part of mastering how to shoot a rifle with a scope.
Why Bullets Don’t Travel in a Straight Line
Once a bullet leaves the barrel, it begins to be affected by gravity immediately. While it travels forward at high speed, it also starts to drop toward the ground. This creates a curved trajectory rather than a straight line.
The longer the distance, the more pronounced this curve becomes. At short ranges, the drop may be minimal and barely noticeable. However, at medium and long distances, bullet drop becomes a significant factor that must be compensated for.
Understanding this behavior helps shooters make more accurate decisions when aiming at targets beyond their zero distance.
This is why scopes are adjusted and not simply pointed directly at distant targets without compensation.
Adjusting for Distance
There are two primary ways to compensate for bullet drop: holdover and turret adjustments. Holdover involves aiming slightly above the target to account for bullet drop. This method is simple and commonly used in hunting or quick shooting situations where time is limited.
Turret adjustments, on the other hand, involve physically adjusting the scope so the reticle aligns with the expected point of impact at a given distance. This method is more precise and is often used in long-range or target shooting scenarios.
Many modern scopes also include reticle markings that assist with distance estimation and bullet drop compensation. These markings allow shooters to make quick adjustments without touching the turrets.
Choosing between holdover and turret adjustment depends on the shooting context, distance, and required precision. Both methods are effective when used correctly.
Common Shooting Distances
Understanding common shooting distances helps shooters develop realistic expectations for scope performance. Short-range shooting typically occurs within 25 to 50 yards and is common in dense environments or indoor ranges. At these distances, bullet drop is minimal, and aiming is relatively straightforward.
Medium-range shooting usually falls between 50 and 200 yards. This is where zeroing becomes especially important, as bullet drop begins to have a noticeable effect. Most beginner shooters develop their primary zero within this range.
Long-range shooting extends beyond 200 yards and requires more advanced knowledge of ballistics, wind compensation, and precise adjustments. At this level, even small errors in aiming or adjustment can lead to significant deviations in impact.
Practicing at multiple distances is essential for developing a complete understanding of how your rifle and scope perform. It builds adaptability and improves confidence in real-world shooting situations.
Consistent practice across different ranges helps shooters understand how bullet trajectory changes with distance, making them more effective and accurate in the field.
Windage, Elevation, and Advanced Scope Adjustments
Once you understand basic aiming and zeroing, the next step in learning how to shoot a rifle with a scope is mastering advanced adjustments. These adjustments allow shooters to correct for environmental conditions, distance changes, and subtle alignment errors. Windage, elevation, and parallax controls are the tools that turn a basic scoped rifle into a precision instrument. Each one plays a specific role in improving accuracy, especially at medium and long ranges where small mistakes become more noticeable.
Windage Adjustment
Windage refers to horizontal adjustment of the rifle scope, meaning left and right corrections. When a shot consistently lands to the left or right of the target, windage adjustment is used to bring the point of impact back into alignment with the point of aim. This is done using the windage turret, which is typically located on the side of the scope.
Each click of the windage turret represents a small, precise shift in the reticle’s horizontal position. Depending on the scope, this may be measured in MOA (Minute of Angle) or MRAD (Milliradian). Understanding these measurements is helpful, but beginners can focus primarily on observing shot group movement rather than complex math.
Environmental factors play a major role in windage adjustments. Wind is the most obvious influence, especially in outdoor shooting conditions. Even a light breeze can push a bullet off course at longer distances. Crosswinds, gusts, and changing wind directions can all affect accuracy differently.
Shooter alignment can also affect windage. If the scope is not properly leveled during setup, shots may drift consistently to one side regardless of wind conditions. This is why proper mounting and leveling are critical before making any adjustments.
The key to effective windage correction is gradual adjustment. Instead of making large changes, shooters should adjust in small increments, fire a group of shots, and evaluate the results. This method ensures accuracy improves steadily without overcorrection.
Elevation Adjustment
Elevation adjustment controls vertical movement of the point of impact. If bullets consistently hit above or below the target, elevation adjustments are used to correct this. The elevation turret is usually located on the top of the scope and is one of the most frequently used controls in long-range shooting.
One of the main reasons elevation adjustments are necessary is bullet drop. As distance increases, gravity causes the bullet to follow a downward arc. Without compensation, shots will land lower than the point of aim. Elevation adjustments allow the shooter to counteract this effect and maintain accuracy at different distances.
Elevation becomes especially important in long-range shooting. At extended distances, even small miscalculations can result in significant vertical deviation. This is why precision shooters rely heavily on elevation adjustments combined with ballistic data or reticle markings.
Like windage, elevation adjustments are made in clicks, each representing a small change in trajectory alignment. The shooter gradually adjusts, fires test groups, and refines the settings until the bullet impact matches the intended point of aim.
Understanding elevation is essential for anyone serious about learning how to shoot a rifle with a scope, as it directly impacts consistency across different distances.
Parallax Adjustment (If Available)
Parallax adjustment is an advanced feature found on many mid-range and high-end rifle scopes. It is designed to eliminate reticle shift when the shooter’s eye moves slightly behind the scope. Without correction, this shift can cause the reticle to appear off-target even when the rifle is perfectly still.
Parallax error becomes more noticeable at longer distances, where even small misalignments can affect precision. By adjusting the parallax setting, the shooter ensures that the reticle and target appear on the same focal plane. This means that regardless of slight head movement, the point of aim remains consistent.
The parallax adjustment knob is usually located on the side of the scope or near the objective lens. It is typically marked with distance settings, allowing shooters to match the adjustment to their shooting range.
When properly set, parallax adjustment improves shooting precision significantly, especially for target shooting or long-range applications. While beginners may not use this feature immediately, it becomes increasingly important as shooting distances increase and precision becomes more demanding.
Shooting Techniques for Better Accuracy
Even with perfect scope setup and adjustments, shooting technique remains the most important factor in achieving consistent accuracy. A rifle scope can only assist the shooter—it cannot compensate for poor body control, unstable positioning, or inconsistent trigger handling. This section focuses on the fundamental techniques that directly influence shot quality and repeatability.
Stable Shooting Position
A stable shooting position is the foundation of accurate rifle shooting. The more stable the shooter, the more consistent the results. There are several common shooting positions, each suited for different environments and purposes.
The bench rest position is often used in target shooting and sighting-in sessions. In this position, the rifle is supported on a stable surface, reducing human movement and allowing for precise adjustments. It is one of the best positions for testing scope zero and evaluating accuracy.
The prone position involves lying flat on the ground while supporting the rifle with a bipod or rest. This position offers excellent stability and is commonly used in both hunting and tactical scenarios. It reduces body movement and allows for controlled breathing and steady aim.
Supported shooting positions, such as using shooting sticks, barriers, or natural rests like trees, are often used in field conditions. These positions balance mobility with stability and are essential for real-world hunting situations.
Regardless of position, the key principle is minimizing movement. Even small shifts in body posture can affect aim and consistency, especially at longer distances.
Trigger Control and Breathing
Trigger control is one of the most critical elements of accurate shooting. A smooth, controlled trigger pull ensures that the rifle fires without disturbing the sight picture. Jerking or slapping the trigger is one of the most common beginner mistakes and often results in shots drifting off target.
The ideal trigger press is slow, steady, and deliberate. Pressure should be applied straight to the rear until the shot breaks naturally. This reduces unwanted movement and improves consistency.
Breathing control is equally important. Most shooters follow a simple technique: inhale, exhale, pause briefly, and fire during the natural respiratory pause. This pause creates a stable moment where body movement is minimized.
Combining smooth trigger control with proper breathing creates a controlled shooting environment where accuracy is significantly improved.
Follow-Through Technique
Follow-through is the process of maintaining your shooting position and focus after the shot is fired. Many beginners immediately lift their head or relax their position after pulling the trigger, which can disrupt accuracy and prevent proper shot evaluation.
Good follow-through involves keeping your eye on the target through the scope even after the shot breaks. This allows the shooter to observe bullet impact and maintain consistent positioning.
Follow-through also helps identify errors in technique. If the shot misses, maintaining sight picture allows the shooter to analyze what may have gone wrong—whether it was breathing, trigger control, or environmental factors.
In practical shooting, follow-through builds discipline and consistency. It ensures that every shot is treated as part of a controlled process rather than a single isolated action.
When combined with stable positioning, proper trigger control, and breathing discipline, follow-through completes the foundation of accurate scoped rifle shooting.
Common Mistakes When Using a Rifle Scope
Even after learning how to mount, zero, and aim with a rifle scope, many shooters still struggle with consistency due to avoidable mistakes. These errors are especially common among beginners, but even experienced shooters can fall into bad habits over time. Understanding these issues is essential if you want to improve accuracy and develop reliable shooting skills.
Not Properly Zeroing the Scope Before Use
One of the most critical mistakes is failing to properly zero the rifle scope before shooting in real conditions. Zeroing ensures that your point of aim matches your point of impact at a specific distance. Without this alignment, every shot becomes unpredictable, no matter how good your technique is.
Some shooters rush this process or skip confirmation groups, assuming a rough adjustment is “good enough.” In reality, even small zeroing errors can lead to significant misses at longer distances. A properly zeroed scope should always be verified through multiple consistent shot groups, not just a single successful hit.
Incorrect Eye Relief Causing Scope Shadow or Injury Risk
Incorrect eye relief is another frequent issue. When the eye is too close to the scope, recoil can cause discomfort or even injury, commonly referred to as “scope bite.” When the eye is too far, shooters often experience scope shadow—a dark ring or partial image that reduces clarity and accuracy.
Proper eye relief should allow a full, clear field of view without strain or movement. This position must feel natural when shouldering the rifle. Many beginners overlook this step during setup, only to struggle with inconsistent sight pictures later.
Maintaining consistent cheek weld and head position is equally important. Even small changes in head placement can alter the sight picture and affect shot placement.
Over-Adjusting Turrets Without Proper Shot Grouping
Another common mistake is over-adjusting windage and elevation turrets without analyzing shot groups. Beginners often expect immediate perfection after each adjustment and make large corrections based on single shots.
This approach leads to inconsistency and frustration. Proper adjustment requires firing multiple-shot groups and analyzing patterns rather than reacting to individual impacts. Each turret click represents a precise change, and overcorrection can push the point of impact further away from the target instead of improving accuracy.
The correct method is gradual refinement: shoot, observe grouping, adjust slightly, and repeat. This disciplined process produces reliable results over time.
Ignoring Bullet Drop at Longer Distances
Ignoring bullet drop is a mistake that becomes more noticeable as shooting distance increases. Many beginners assume that aiming directly at the target is enough, especially after zeroing at a short distance. However, gravity affects every bullet, causing it to follow a curved trajectory.
At longer ranges, this drop becomes significant. Without proper compensation—either through holdover or turret adjustments—shots will consistently land low. Understanding bullet behavior is essential for accurate long-range shooting.
Failing to account for this factor often leads to missed shots even when all other fundamentals are correct.
Poor Mounting or Loose Scope Rings
Improper mounting or loose scope rings can completely undermine shooting accuracy. If the scope shifts during recoil, even slightly, the point of impact will change unpredictably. This issue is often mistaken for poor zeroing or ammunition inconsistency when the real problem is mechanical instability.
Scope rings must be properly tightened to manufacturer specifications and checked regularly. Any movement between the rifle and scope system introduces errors that cannot be corrected through aiming or adjustment alone.
A stable mounting system is the foundation of consistent accuracy. Without it, all other efforts become unreliable.
Failing to Practice With Real Shooting Conditions
Many shooters practice only under controlled or ideal conditions, such as bench rest shooting at fixed distances. While this is useful for zeroing and basic skill development, it does not prepare shooters for real-world scenarios.
Field conditions often include wind, uneven terrain, movement, and varying distances. Failing to practice under these conditions can lead to poor performance when it matters most. Practical shooting experience builds adaptability and confidence.
Regular practice in different environments helps shooters understand how their rifle and scope behave outside of perfect conditions. This is essential for hunting, sport shooting, and any real-world application.
Best Practices for Consistent Accuracy
Improving accuracy with a rifle scope is not just about avoiding mistakes—it is about building consistent habits that reinforce precision over time. By following a structured approach to shooting, maintenance, and practice, shooters can significantly improve their performance and reliability in any environment.
Always Confirm Zero Before Hunting or Competition
One of the most important habits for any shooter is confirming zero before entering a hunting or competitive shooting situation. Even if the rifle was previously zeroed, factors such as transportation, temperature changes, or minor mechanical shifts can affect alignment.
A quick confirmation group at the range ensures that the rifle is still performing as expected. This simple step prevents missed opportunities and improves confidence when it matters most.
Use Quality Ammunition for Consistent Performance
Ammunition quality plays a major role in accuracy and consistency. Different types of ammunition can produce slightly different velocities and trajectories, which affects point of impact. Using consistent, high-quality ammunition reduces variability and improves shot grouping.
Shooters who switch between different brands or loads without testing often experience unpredictable results. Consistency in ammunition choice is just as important as consistency in shooting technique.
Practice at Different Distances Regularly
Practicing at multiple distances is essential for developing a complete understanding of rifle and scope performance. Short, medium, and long-range shooting each present different challenges that require adjustment and awareness.
Regular practice helps shooters understand bullet drop, wind effects, and holdover requirements in real time. It also builds confidence and adaptability, which are critical for real-world shooting situations.
Maintain Scope and Check Mounting Stability
Proper maintenance ensures long-term accuracy. Scopes and mounting systems should be inspected regularly for signs of loosening, wear, or damage. Even minor shifts in mounting stability can affect shot placement significantly.
Cleaning lenses, checking ring tightness, and ensuring all components are secure should become part of routine firearm care. A well-maintained scope performs more reliably and consistently over time.
Keep Detailed Shooting Logs for Adjustments
Keeping a shooting log is a highly effective practice used by experienced shooters. Recording details such as distance, ammunition type, weather conditions, and scope adjustments helps identify patterns in performance.
Over time, this information becomes valuable for refining technique and improving accuracy. It also helps shooters understand how different variables affect their rifle system.
A simple log can make a significant difference in long-term shooting development, turning casual practice into structured improvement.
When combined, these best practices create a strong foundation for consistent accuracy. They reinforce discipline, improve understanding of equipment, and ensure that every shot is part of a controlled and repeatable process.
Expert Insight Summary
A rifle scope is often seen as a tool that automatically improves accuracy, but in reality, its performance depends heavily on how well it is set up and used. Even high-quality optics cannot compensate for poor mounting, incorrect zeroing, or inconsistent shooting fundamentals. The scope is only as effective as the shooter behind it.
Most accuracy problems do not come from equipment failure. Instead, they come from user-related factors such as improper eye alignment, unstable shooting positions, rushed adjustments, or a lack of understanding of basic ballistics. These issues can create inconsistent shot placement even when the rifle and scope are perfectly functional.
Proper adjustment techniques, including careful windage and elevation corrections, are essential for maintaining accuracy. Combined with a stable shooting position, these adjustments ensure that the rifle system performs consistently across different distances and conditions.
Training is another critical factor. Regular practice helps build muscle memory, improve trigger control, and develop familiarity with how the rifle behaves under real shooting conditions. Without training, even advanced optics will not deliver reliable results.
Finally, understanding basic ballistics—such as bullet drop, trajectory, and environmental influence—significantly improves long-range performance. Shooters who understand how bullets behave in flight are better prepared to make accurate adjustments in the field.
Conclusion
Learning how to shoot a rifle with a scope is a process that combines technical setup, consistent practice, and a solid understanding of shooting fundamentals. A scope is a powerful tool, but it requires proper installation, accurate zeroing, and disciplined use to deliver reliable results.
Zeroing the scope correctly and making precise adjustments are essential steps in achieving accuracy. Without these foundations, even experienced shooters will struggle to maintain consistent performance. Each adjustment—whether windage, elevation, or parallax—plays a role in refining shot placement.
However, consistency and training remain more important than expensive equipment. A well-practiced shooter with a basic scope will always outperform an untrained shooter with premium optics. Skill development, repetition, and attention to detail are what truly define shooting success.
The final recommendation is simple: focus on mastering the basics first. Learn how to mount, zero, and use your scope effectively before moving into advanced long-range techniques. Once the fundamentals are solid, advanced skills become much easier to develop and apply in real-world situations.
Frequently Asked Questions (50+ FAQs on How to Shoot a Rifle with a Scope)
1. What is the most important first step when using a rifle scope?
The most important first step is proper setup and zeroing of the scope. Many beginners rush directly into shooting without confirming that the scope is correctly mounted and aligned. Zeroing ensures that the point of aim matches the point of impact at a specific distance. Without this foundation, even perfect shooting technique will not produce consistent accuracy. A properly zeroed scope also builds confidence because the shooter can predict where each shot will land under controlled conditions.
2. Do I need to zero my scope every time I shoot?
No, you do not need to zero your scope every time you shoot, but you should regularly confirm zero. Changes in temperature, transport conditions, recoil, or accidental bumps can slightly shift your scope alignment. A quick confirmation group at the range ensures your rifle is still accurate. Many experienced shooters check zero before hunting trips or competitions to avoid surprises in the field.
3. What distance should I zero my rifle scope at?
The most common zero distances are 50 yards and 100 yards, depending on the intended use. A 100-yard zero is widely used for general shooting and hunting because it provides a balanced trajectory. Shorter distances like 50 yards may be used for indoor ranges or specific hunting environments. The key is consistency—choose a distance that matches your typical shooting scenario and stick with it.
4. Why do I see a black ring or shadow in my scope?
This is called scope shadow and it usually happens when your eye is not properly aligned with the scope. It means your eye is too far, too close, or slightly off-center. Adjusting eye relief and improving cheek weld usually solves this issue. Consistent head positioning is essential to avoid this problem and maintain a clear sight picture.
5. What is eye relief in a rifle scope?
Eye relief is the distance between your eye and the scope’s eyepiece. Proper eye relief allows you to see a full image without strain or shadowing. It also ensures safety by preventing recoil-related injury, especially with higher-caliber rifles. Eye relief should feel natural when you shoulder the rifle in a normal shooting position.
6. What happens if my scope is not level?
If your scope is not level, your shots may drift left or right as distance increases. This is known as canting error. Even a small tilt can cause noticeable accuracy issues at long range. Proper leveling during installation ensures that windage and elevation adjustments work correctly and predictably.
7. What is the difference between windage and elevation?
Windage controls left and right adjustments, while elevation controls up and down adjustments. Windage is mainly used to correct horizontal drift caused by wind or alignment issues. Elevation is used to compensate for bullet drop over distance. Together, they allow precise control over shot placement.
8. How do I know if my scope is properly mounted?
A properly mounted scope should feel completely stable with no movement when gently handled. The rings should be tightened evenly, and the scope should remain level with the rifle. There should be no shifting during recoil. If anything feels loose or unstable, the mounting system should be rechecked immediately.
9. What is bullet drop?
Bullet drop refers to the downward curve of a bullet’s trajectory caused by gravity. After leaving the barrel, a bullet begins to fall gradually while traveling forward. The farther the distance, the more noticeable the drop becomes. Understanding bullet drop is essential for accurate long-range shooting.
10. What is holdover in shooting?
Holdover is a technique where the shooter aims slightly above the target to compensate for bullet drop. Instead of adjusting the scope turrets, the shooter manually adjusts the point of aim. This method is commonly used in hunting or fast shooting situations where time is limited.
11. What is parallax in a rifle scope?
Parallax occurs when the reticle appears to shift position relative to the target when the shooter moves their eye. This can cause small aiming errors. Adjustable parallax scopes allow shooters to eliminate this effect, improving precision at longer distances.
12. Do I need an expensive scope to shoot accurately?
No, expensive scopes are not required for accurate shooting. While higher-quality optics offer better clarity and durability, accuracy depends more on setup, zeroing, and technique. A properly used budget scope can outperform a poorly used premium scope.
13. Why is my rifle not grouping shots tightly?
Poor shot grouping can be caused by inconsistent trigger control, improper zeroing, unstable shooting position, or poor-quality ammunition. It is important to isolate variables and test systematically to identify the cause. Consistency in technique and equipment usually resolves grouping issues.
14. What is the best shooting position for beginners?
The bench rest position is best for beginners because it provides maximum stability. It reduces body movement and allows shooters to focus on fundamentals like aiming and trigger control. Once comfortable, shooters can progress to prone or supported field positions.
15. Should I use both eyes open when using a scope?
It depends on experience and preference. Using both eyes open improves situational awareness and is common in hunting. Using one eye closed can help beginners focus more clearly on the reticle. Both methods are valid as long as consistency is maintained.
16. What causes missed shots even after zeroing?
Missed shots after zeroing are often caused by environmental factors such as wind, improper shooting form, inconsistent trigger control, or incorrect distance estimation. Even a properly zeroed rifle requires good technique and awareness of conditions.
17. How often should I clean my rifle scope?
You should clean your scope lenses only when necessary using proper optical cleaning tools. Over-cleaning can damage lens coatings. Regularly check for dust, moisture, or smudges, but avoid excessive wiping unless visibility is affected.
18. What is the best caliber for beginners?
The 9mm is often recommended for handgun shooting, while .22 LR is ideal for rifle training. For scoped rifles, .223/5.56 is commonly used for beginners due to manageable recoil and affordability. The best choice depends on purpose and comfort level.
19. Why do my shots move after adjusting the scope?
This can happen if adjustments are too large, inconsistent, or not based on proper shot grouping. It may also indicate loose mounting or incorrect zeroing procedure. Adjustments should always be small and confirmed with multiple shots.
20. Can weather affect my shooting accuracy?
Yes, weather conditions such as wind, temperature, and humidity can affect bullet trajectory. Wind can push bullets off course, while temperature changes can slightly affect velocity. Understanding these factors improves long-range accuracy.
21. What is MOA in rifle scopes?
MOA stands for Minute of Angle, a measurement used to describe small angular adjustments in scopes. It helps shooters fine-tune windage and elevation settings. Understanding MOA is useful for precision shooting and long-range adjustments.
22. What is MRAD?
MRAD (milliradian) is another measurement system used for scope adjustments. It is commonly used in tactical and long-range shooting. Like MOA, it helps shooters make precise corrections to bullet impact.
23. How far can I shoot accurately with a scope?
Effective range depends on rifle type, ammunition, and shooter skill. Many scoped rifles are accurate up to several hundred yards or more when properly zeroed and used with correct technique. Long-range accuracy requires additional skill and environmental awareness.
24. Why is my scope blurry?
A blurry scope is usually caused by incorrect diopter adjustment or improper focus. Adjust the eyepiece until the reticle appears sharp. If the target is blurry but the reticle is clear, the scope may need magnification adjustment or better lighting.
25. Can I use a rifle scope for hunting and target shooting?
Yes, most rifle scopes are designed for both hunting and target shooting. However, different models may be optimized for specific uses. Hunting scopes often prioritize durability and quick target acquisition, while target scopes focus on precision and adjustability.
26. Why do my shots spread out over distance?
Shot spread at longer distances is often caused by wind, inconsistent ammunition, or small aiming errors. It may also indicate improper zeroing or unstable shooting positions. Long-range shooting magnifies even minor inconsistencies.
27. What is a good practice routine for beginners?
A good practice routine includes basic marksmanship drills, short-range accuracy training, and gradual distance progression. Consistent repetition builds muscle memory and improves confidence with scope usage.
28. Do I need a spotting scope?
A spotting scope is helpful but not required. It allows shooters to see bullet impact without walking to the target. This improves efficiency during zeroing and long-range practice sessions.
29. What is the biggest mistake beginners make?
The biggest mistake is skipping proper zeroing and rushing into shooting at long distances. This leads to inconsistent results and frustration. Building strong fundamentals is always more important than advanced techniques.
30. How long does it take to learn rifle scope shooting?
Basic proficiency can be achieved within a few practice sessions, but mastery takes consistent training over time. Improvement depends on frequency of practice, understanding of fundamentals, and quality of instruction.
31. How important is ammunition consistency when shooting with a scope?
Ammunition consistency is extremely important for accurate scoped shooting. Even small variations in bullet weight, powder charge, or manufacturing quality can affect velocity and trajectory. When ammunition is inconsistent, shot groups become unpredictable, even if your scope is perfectly zeroed. For best results, shooters should use the same brand and load when practicing and when shooting in real conditions. This ensures stable performance and helps maintain a reliable zero over time.
32. Can a rifle scope improve a beginner’s accuracy immediately?
A rifle scope can improve visibility and aiming precision, but it does not automatically make a beginner more accurate. In fact, beginners may initially struggle more because they must learn eye relief, reticle focus, and proper alignment. Once fundamentals are learned, however, a scope becomes a powerful tool that significantly enhances accuracy compared to iron sights.
33. Why do experienced shooters still miss targets with a scope?
Even experienced shooters can miss due to environmental factors, misjudged distance, wind changes, or minor inconsistencies in shooting form. A scope improves precision, but it cannot eliminate human error or external conditions. Long-range shooting especially magnifies small mistakes, making consistency and attention to detail essential.
34. How does recoil affect scope accuracy?
Recoil can affect accuracy if the shooter is not maintaining a stable position or proper follow-through. It can also reveal mounting issues if the scope shifts during firing. Consistent recoil management ensures the rifle returns to the same position after each shot, improving repeatability and shot grouping.
35. What is the role of breathing in scoped shooting?
Breathing control is essential for maintaining stability during the shot. Most shooters take a breath, exhale, and pause briefly before firing. This natural pause reduces body movement and creates a stable shooting window. Poor breathing control often leads to vertical shot dispersion.
36. Should I adjust my scope during hunting?
In most hunting situations, large adjustments should be avoided due to time constraints. Instead, hunters typically use holdover techniques or pre-set zero distances. Adjustments are more commonly made during practice sessions, not in the field, to avoid mistakes under pressure.
37. How do I know if my scope is damaged?
Signs of a damaged scope include inconsistent zero, blurry optics that cannot be corrected, internal fogging, or visible movement in the reticle. Physical damage to the housing or turrets can also affect performance. If accuracy suddenly drops without explanation, scope inspection is recommended.
38. Why is my reticle not centered?
A misaligned reticle may result from improper mounting, scope damage, or manufacturing issues. It can also appear off-center if the rifle is not leveled during setup. Ensuring correct installation and leveling usually resolves this issue.
39. What is the best way to practice with a rifle scope?
The best practice method is structured repetition. Start at short distances, focus on consistent grouping, and gradually increase range. Practice should include proper breathing, trigger control, and position stability. Recording results helps track improvement over time.
40. Can wind completely change bullet path?
Yes, wind can significantly affect bullet trajectory, especially at longer distances. Even mild wind can push bullets off target. Understanding wind direction and speed is an advanced skill that becomes increasingly important for long-range shooting.
41. What is the difference between fixed and variable scopes?
Fixed scopes have one magnification level, while variable scopes allow adjustable zoom. Variable scopes offer more flexibility for different distances, while fixed scopes are simpler and often more durable. The choice depends on shooting needs and preference.
42. Why do I need to practice at multiple distances?
Practicing at multiple distances helps shooters understand how bullet trajectory changes over range. It builds adaptability and improves judgment for holdover or adjustments. This is essential for real-world shooting scenarios where distances are not fixed.
43. What is a good first scope magnification?
A moderate magnification range, such as 3-9x or 4-12x, is ideal for beginners. These ranges offer flexibility for both short and medium distances while remaining easy to use. Extremely high magnification is not necessary for beginners.
44. How do I prevent scope movement during recoil?
Proper mounting, correct torque settings, and high-quality rings are essential to prevent movement. All screws should be tightened evenly, and the scope should be checked regularly. Poor mounting is one of the most common causes of shifting zero.
45. Why does my shot group change between sessions?
Changes in shot grouping between sessions can be caused by environmental conditions, different ammunition, or minor shifts in scope mounting. Temperature, humidity, and handling can all influence performance. Consistency in setup helps reduce these variations.
46. Do I need professional training to use a rifle scope?
Professional training is not required, but it is highly beneficial. A qualified instructor can help correct bad habits early and improve learning speed. However, many shooters also develop strong skills through disciplined self-practice and study.
47. How does distance estimation affect shooting accuracy?
Incorrect distance estimation is one of the most common causes of missed shots. If the distance is misjudged, bullet drop compensation will be incorrect. Rangefinders or reticle-based estimation tools can help improve accuracy significantly.
48. What is the safest way to handle a scoped rifle?
A scoped rifle should always be treated as loaded, with the muzzle pointed in a safe direction. Finger discipline, proper storage, and awareness of surroundings are essential. A scope does not change firearm safety rules.
49. Can lighting conditions affect scope performance?
Yes, lighting affects visibility and target clarity. Low-light conditions can make targets harder to see, while bright light can cause glare. High-quality scopes improve light transmission, but shooters must still adapt to conditions.
50. What is the most important habit for long-term accuracy?
Consistency is the most important habit. Consistent shooting position, trigger control, ammunition choice, and scope setup all contribute to long-term accuracy. Small variations in technique can lead to large differences in results over time.
Read more: