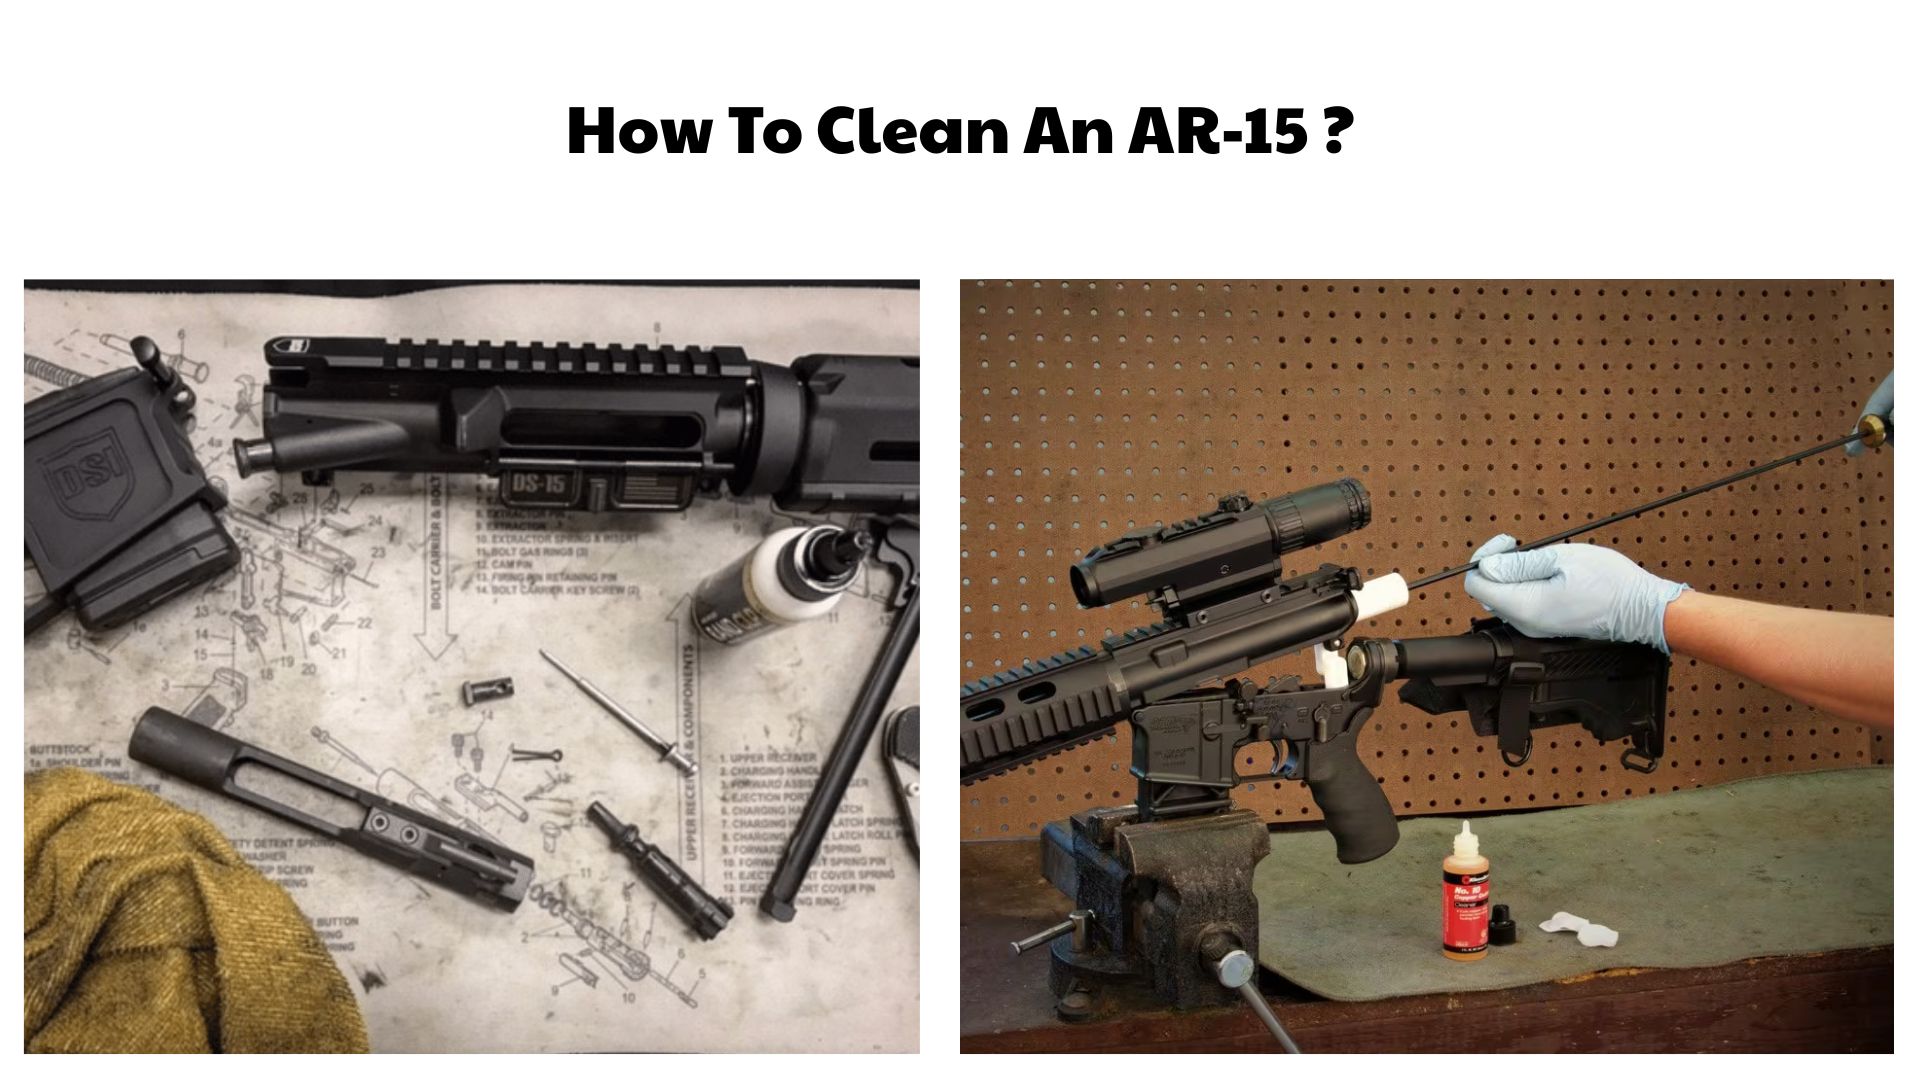

Cleaning an AR-15 is one of the most important aspects of maintaining the rifle’s reliability, accuracy, and long-term durability. The AR-15 platform operates using a direct impingement or piston-driven gas system, both of which generate carbon fouling and heat during firing. Without proper maintenance, residue buildup can negatively impact cycling, extraction, and overall performance.
Routine cleaning helps ensure that the rifle functions safely and consistently under a variety of conditions. A clean AR-15 is less likely to experience malfunctions such as failures to feed, failures to extract, or sluggish bolt movement caused by carbon accumulation and inadequate lubrication.
Carbon buildup is especially common around the bolt carrier group (BCG), chamber, and gas system. As rounds are fired, hot gases and combustion residue travel through the rifle, leaving deposits that can harden over time. If ignored, this fouling can increase wear on moving components and eventually reduce reliability.
It is also important to understand the difference between basic cleaning, routine maintenance, and deep cleaning. Basic cleaning typically involves wiping down major components, cleaning the barrel, and reapplying lubrication after a shooting session. Maintenance includes inspections of wear items such as gas rings, extractor springs, and pins. Deep cleaning involves full disassembly and detailed removal of stubborn carbon deposits from hard-to-reach areas.
The frequency of cleaning depends largely on how the rifle is used. Casual shooters may only need a standard cleaning after each range session, while rifles used heavily in competitions, tactical training, or suppressed shooting often require more frequent maintenance due to increased fouling and heat buildup.
Safety Rules Before Cleaning an AR-15
Always Treat the Rifle as Loaded
Before beginning any cleaning procedure, always follow the fundamental rule of firearm safety: treat every firearm as if it is loaded. Even if you believe the rifle is unloaded, physically verify its condition before handling or disassembling it.
Start by removing the magazine from the rifle. After the magazine is removed, pull the charging handle rearward and lock the bolt open. Visually inspect the chamber and magazine well to confirm there is no ammunition present. It is also recommended to physically check the chamber with a finger for added safety assurance.
Keeping the muzzle pointed in a safe direction throughout the process is critical. Establishing consistent safety habits reduces the risk of negligent discharges and creates a safer cleaning environment.
Safe Cleaning Environment Setup
Choosing an appropriate workspace is another essential part of safe firearm maintenance. A stable, flat surface with adequate room for tools and rifle components will make the cleaning process more organized and efficient.
All live ammunition should be removed from the immediate area before cleaning begins. Keeping ammunition separate from the workspace minimizes the risk of accidental loading during maintenance.
Good lighting is important for inspecting carbon buildup, wear patterns, and small components inside the rifle. Many gun owners also use protective mats or towels on the work surface to prevent scratches and keep small parts from rolling away.
Ventilation is equally important when using solvents or degreasers. Some cleaning chemicals produce strong fumes, so working in a well-ventilated area helps reduce prolonged exposure.
Tools and Supplies Needed for Cleaning
Essential Cleaning Kit
A proper AR-15 cleaning kit should include several core tools designed specifically for modern sporting rifles. One of the most important tools is a bore brush and cleaning rod. The bore brush helps scrub carbon and copper fouling from the barrel, while the rod allows patches and brushes to pass through the bore safely.
Cleaning patches and a jag are also essential. Patches are used to apply solvent, remove debris, and dry the bore after cleaning. A jag securely holds the patch in place for effective contact with the inside of the barrel.
A chamber brush is another key tool because the chamber area tends to accumulate significant carbon buildup. Chamber brushes are specifically shaped to clean locking lug recesses and difficult-to-reach areas near the chamber.
Solvents and Lubricants
Cleaning chemicals play a major role in maintaining the AR-15 platform. One of the most commonly used products is CLP, which stands for Clean, Lubricate, and Protect. CLP products are versatile and combine multiple functions into a single solution, making them popular among military personnel and civilian shooters.
Dedicated carbon removers and degreasers can also be useful for removing stubborn fouling from the bolt carrier group and chamber areas. These products help dissolve hardened residue that standard oil may not remove effectively.
Gun oil and light lubricants are essential for reducing friction between moving components. Proper lubrication ensures smooth cycling, minimizes wear, and improves reliability during extended firing sessions.
Optional but Helpful Tools
While not mandatory, several optional tools can make AR-15 cleaning easier and more effective. A bore guide helps align the cleaning rod and protects the barrel from unnecessary wear during cleaning.
Dental picks or carbon scraper tools are commonly used to remove stubborn carbon buildup around the bolt tail and locking lugs. These tools should be used carefully to avoid scratching metal surfaces.
Nylon brushes and microfiber cloths are also valuable additions to a cleaning kit. Nylon brushes help scrub sensitive surfaces without causing damage, while microfiber cloths are ideal for wiping away excess solvent and oil.
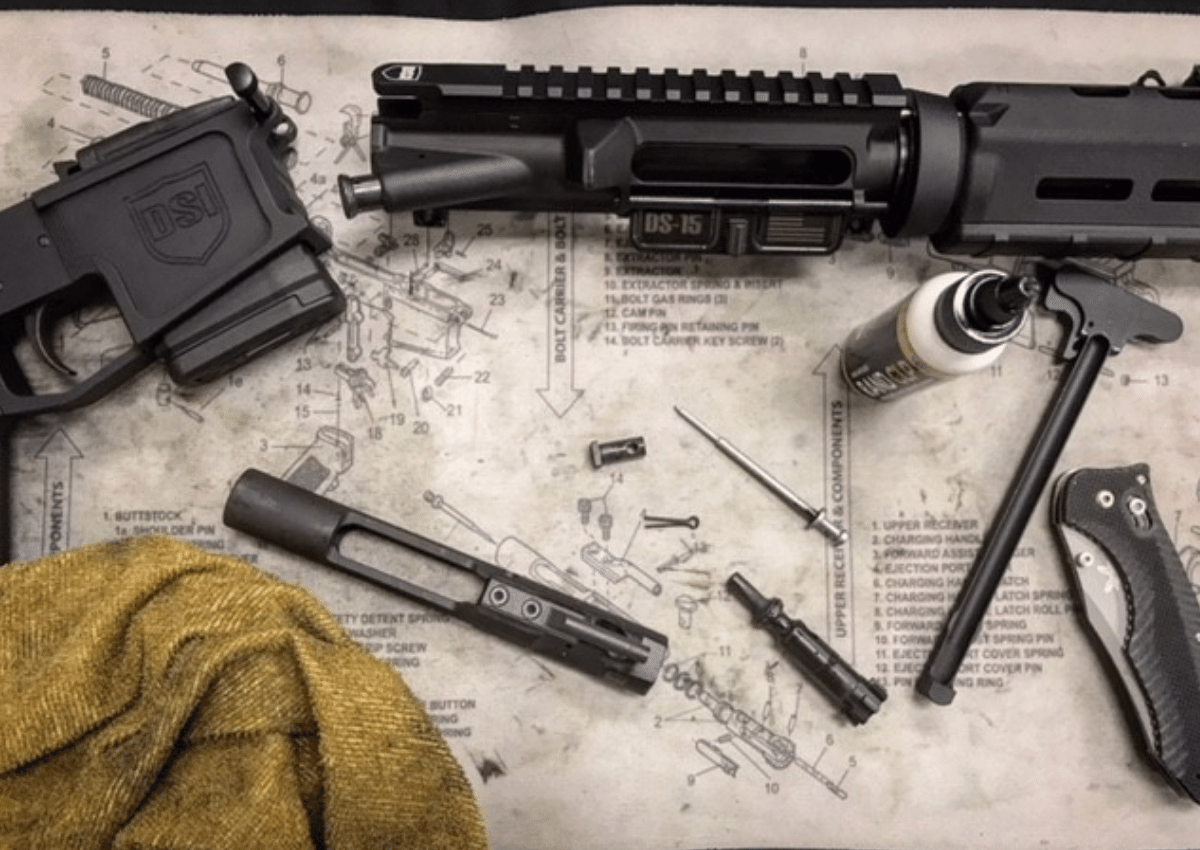
Step 1 – Field Strip the AR-15
Separate Upper and Lower Receiver
The first step in cleaning an AR-15 is field stripping the rifle into its primary components. Begin by pushing out the rear takedown pin located above the pistol grip. This allows the upper receiver to pivot forward from the lower receiver.
Next, push out the front pivot pin to fully separate the upper and lower receivers. Breaking the rifle down into these main sections provides easier access to internal components and simplifies the cleaning process.
Field stripping does not require advanced tools and is designed to be performed quickly for routine maintenance.
Remove Bolt Carrier Group and Charging Handle
With the upper receiver separated, pull the charging handle rearward to remove the bolt carrier group (BCG). The BCG is one of the most important components to clean because it accumulates heavy carbon fouling during operation.
After removing the BCG, carefully slide the charging handle downward and out of the upper receiver. Both parts should be placed on a clean surface for inspection and cleaning.
Removing these components provides direct access to the chamber, barrel extension, and interior of the upper receiver.
Step 2 – Cleaning the Barrel
Dry Patch Initial Pass
Before applying solvents, begin by running a dry patch through the barrel to remove loose carbon, dirt, and debris. This initial pass helps prevent excessive fouling from spreading during the cleaning process.
Using a cleaning rod and jag, insert the patch from the chamber end and push it completely through the muzzle. Avoid dragging dirty patches back through the bore whenever possible.
Bore Brush Cleaning
After the dry patch pass, apply solvent to a bore brush and run it through the barrel several times. The brush helps loosen carbon and copper fouling that has accumulated inside the rifling.
Always clean from the chamber toward the muzzle whenever possible. This cleaning direction helps protect the crown of the barrel, which plays a critical role in maintaining accuracy.
Allowing solvent to sit in the bore for a few minutes can help break down stubborn fouling before additional brushing.
Patching Until Clean
Once brushing is complete, run clean patches through the barrel repeatedly until they come out relatively clean. This process removes loosened debris, solvent residue, and remaining fouling.
Dark black residue typically indicates carbon buildup, while blue or green discoloration may signal copper fouling from bullet jackets. Heavily fouled barrels may require multiple cleaning cycles before patches come out clean.
Final Bore Protection
After cleaning is complete, apply a very light coat of oil to the bore if the rifle will be stored for an extended period. This thin protective layer helps prevent corrosion and rust formation.
If the rifle will be used again soon, many shooters prefer leaving the bore mostly dry to avoid excess oil affecting the first shots fired. Regardless of preference, the bore should always be inspected before the rifle is returned to service.
Step 3 – Cleaning the Bolt Carrier Group (BCG)
Disassembly of BCG
The bolt carrier group (BCG) is one of the dirtiest parts of an AR-15 because it handles the gas pressure and cycling operation during firing. Proper cleaning begins with complete field disassembly of the BCG.
Start by removing the firing pin retaining pin from the side of the bolt carrier. Once the retaining pin is removed, tilt the carrier rearward and allow the firing pin to slide out carefully.
Next, rotate the cam pin approximately 90 degrees and lift it out of the carrier. After the cam pin is removed, the bolt can be pulled forward and separated from the carrier body.
Breaking the BCG down into individual components allows for thorough cleaning of hidden carbon buildup areas and helps identify signs of wear or damage before they become serious problems.
Carbon Removal
Carbon buildup is especially common around the bolt tail, inside the carrier, and near the gas key. Use solvent and a nylon brush to loosen heavy fouling before wiping surfaces clean with patches or cloths.
The bolt tail often develops thick carbon deposits after extended firing sessions. Many shooters use a carbon scraper tool or dental pick to remove hardened buildup carefully. However, aggressive scraping should be avoided because excessive force can damage protective finishes or metal surfaces.
The gas key should also be inspected and cleaned thoroughly. Carbon accumulation inside the gas key can restrict gas flow and negatively affect cycling reliability.
Special attention should be given to the bolt face and locking lugs. Carbon, brass shavings, and fouling can accumulate in these areas and interfere with proper lockup if not cleaned regularly.
Inspecting Parts
Cleaning time is also an ideal opportunity to inspect the condition of critical BCG components. One of the most important inspections involves the gas rings located on the rear portion of the bolt.
Gas rings help maintain proper gas pressure inside the carrier. Worn or damaged gas rings can lead to reduced cycling reliability and short-stroking issues. A common test involves extending the bolt and standing the carrier vertically on the bolt face. If the carrier collapses under its own weight, the gas rings may require replacement.
The extractor should also be inspected carefully for chipped edges, weak spring tension, or unusual wear. Since the extractor is responsible for removing spent casings from the chamber, a damaged extractor can quickly lead to malfunctions.
Inspect the firing pin for deformation, cracks, or unusual wear marks. Additionally, check the cam pin for excessive wear because it experiences significant stress during cycling.
Reassembly and Prep
Once cleaning and inspection are complete, lightly lubricate key contact points before reassembling the BCG. Apply a thin layer of oil to the bolt body, gas rings, cam pin, and carrier rails.
Reinsert the bolt into the carrier, followed by the cam pin. Rotate the cam pin into position, then insert the firing pin into the rear of the carrier. Finally, reinstall the firing pin retaining pin securely.
The bolt carrier group should move smoothly after reassembly, with visible lubrication present but not excessive pooling of oil.
Step 4 – Cleaning Upper Receiver
Chamber Cleaning
The chamber area of an AR-15 experiences significant carbon buildup and should be cleaned thoroughly during routine maintenance. A chamber brush designed specifically for AR-style rifles is the most effective tool for this task.
Apply solvent to the chamber brush and rotate it inside the chamber using a cleaning rod or chamber handle. The specialized brush design helps clean the locking lug recesses and other hard-to-reach surfaces near the barrel extension.
After brushing, use clean patches or cloths to remove loosened debris and excess solvent. A clean chamber helps ensure reliable extraction and feeding during operation.
Feed Ramps and Gas Tube Area
Feed ramps should be inspected and cleaned carefully because carbon and brass residue can accumulate over time. Use a nylon brush and solvent to remove buildup while avoiding excessive scraping that could damage the finish.
The gas tube area should also be visually inspected for excessive fouling, looseness, or signs of obstruction. Although the inside of the gas tube generally does not require direct cleaning, ensuring the gas system remains unobstructed is important for reliable cycling.
Inspect the gas key alignment and confirm there are no obvious leaks or signs of abnormal wear around the gas system components.
Charging Handle Cleaning
The charging handle accumulates carbon residue along its rails and contact surfaces due to gas blowback during operation. Use solvent and a brush to clean these surfaces thoroughly.
Pay particular attention to the underside and latch areas where residue commonly builds up. Once cleaned, apply a light coat of lubricant to the rails to ensure smooth operation when cycling the rifle.
Step 5 – Cleaning Lower Receiver
Trigger Group Care
The lower receiver generally accumulates less fouling than the upper receiver, but it still requires regular maintenance. Use a nylon brush or compressed air to remove dust, carbon particles, and debris from the trigger group area.
Over-disassembling the trigger assembly is usually unnecessary for routine cleaning. In most cases, light brushing and lubrication are sufficient to maintain reliable trigger function.
Avoid flooding the trigger mechanism with excessive oil because too much lubricant can attract dirt and debris over time.
Buffer Tube Area
The buffer tube and recoil spring area can collect carbon dust and debris during firing. Remove the buffer and spring from the receiver extension and wipe them down with a cloth.
Inspect the buffer spring for unusual wear, bending, or corrosion. Light lubrication may be applied sparingly to reduce friction and spring noise during cycling.
Magazine Well Cleaning
The magazine well should also be inspected and cleaned regularly. Dirt, dust, and debris can accumulate inside the magwell and potentially interfere with magazine insertion or feeding reliability.
Use a cloth or nylon brush to wipe down the interior surfaces and inspect for obstructions or excessive wear.
Step 6 – Proper Lubrication Points
Bolt Carrier Group
The bolt carrier group is the primary lubrication point on an AR-15. Apply lubricant to the carrier rails, cam pin, bolt body, and gas ring area to ensure smooth cycling.
Many experienced shooters follow the “run it wet” philosophy, meaning the BCG should remain visibly lubricated during operation to reduce friction and wear under heavy firing conditions.
Upper Receiver Contact Points
The charging handle channels and internal contact surfaces inside the upper receiver should receive a light coat of lubricant. This helps reduce friction during cycling and improves smooth operation.
Only a thin layer of oil is necessary because excessive lubricant can attract carbon buildup and debris.
Lower Receiver Moving Parts
Light lubrication can also be applied to moving parts inside the lower receiver, including trigger pins, selector components, and the buffer spring.
Care should be taken not to over-lubricate the trigger assembly, as excessive oil can collect fouling and negatively affect trigger performance over time.
Step 7 – Reassembly Process
After all components are cleaned and lubricated, begin reassembling the rifle by inserting the charging handle into the upper receiver. Next, slide the bolt carrier group into position beneath the charging handle.
Join the upper and lower receivers together by aligning the pivot pin lugs and pushing the pivot pin back into place. Close the receivers together and secure the rear takedown pin.
Once assembled, perform a full function check to confirm the rifle operates correctly. Verify the safety selector functions properly, ensure the trigger resets correctly, and confirm smooth bolt cycling before returning the rifle to service.
AR-15 Cleaning Schedule
After Every Range Session
After each range session, perform at least a quick cleaning routine that includes wiping down the bolt carrier group, cleaning the barrel, and reapplying lubrication.
This basic maintenance helps prevent carbon buildup from hardening and keeps the rifle ready for future use.
500–1000 Rounds Maintenance
After approximately 500 to 1000 rounds, a more detailed cleaning should be performed. This includes deeper cleaning of the chamber, bolt carrier group, and internal receiver surfaces.
Wear components such as gas rings and extractor springs should also be inspected during this maintenance interval.
Deep Cleaning Interval
Periodic deep cleaning is recommended for rifles that see heavy use. Deep cleaning may involve full bolt disassembly, detailed inspection of springs and pins, and thorough carbon removal from hard-to-reach areas.
This type of maintenance helps identify wear issues early and extends the operational lifespan of the rifle.
Suppressed Shooting Adjustments
Suppressor use significantly increases carbon fouling and heat inside the AR-15 system. Rifles used with suppressors generally require more frequent cleaning and lubrication.
The bolt carrier group, chamber, and charging handle area tend to accumulate fouling faster when suppressed, making consistent maintenance even more important.
Common Mistakes When Cleaning an AR-15
One of the most common mistakes is over-oiling the rifle. Excessive lubrication can attract dirt and carbon, eventually creating sludge-like buildup that interferes with reliable operation.
Under-lubrication is equally problematic because dry metal-on-metal contact increases wear and can cause cycling issues during rapid fire.
Another common mistake involves cleaning the barrel from the muzzle end improperly, which can potentially damage the barrel crown and negatively affect accuracy.
Over-scraping bolt components with metal tools can remove protective coatings or damage surfaces. Carbon removal should be done carefully and only as aggressively as necessary.
Some shooters also neglect gas system maintenance entirely. While the gas tube itself rarely requires direct cleaning, regular inspection of gas-related components is important for long-term reliability.
Pro Tips for Better Maintenance
Many experienced AR-15 users recommend the “run it wet” philosophy, especially for rifles used in high-round-count training or tactical applications. Keeping the bolt carrier group properly lubricated significantly improves reliability.
CLP products are excellent for general-purpose maintenance, but dedicated solvents and carbon removers can be more effective for deep cleaning stubborn fouling.
Consistency is one of the most important maintenance habits. Regular cleaning after shooting sessions prevents carbon buildup from becoming difficult to remove later.
At the same time, over-cleaning should also be avoided. Excessive disassembly or aggressive scrubbing can unnecessarily wear parts and finishes. A balanced cleaning routine is usually the most effective approach.
Final Thoughts
The AR-15 platform is highly reliable when properly maintained. Routine cleaning and lubrication help ensure consistent cycling, safe operation, and long-term durability.
Most AR-15 malfunctions can be prevented through simple maintenance habits such as regular cleaning, proper lubrication, and periodic inspection of wear components.
Ultimately, proper cleaning not only improves reliability and accuracy but also significantly extends the lifespan of the rifle. Whether used for recreational shooting, competition, or professional applications, a well-maintained AR-15 will continue to perform effectively for years.
Frequently Asked Questions About Cleaning an AR-15
1. How often should you clean an AR-15?
The cleaning frequency depends on how often the rifle is used and under what conditions it operates. For most shooters, a basic cleaning after every range session is recommended to remove carbon fouling, dirt, and moisture. Rifles exposed to heavy firing schedules, dusty environments, or suppressed shooting may require more frequent maintenance. Competitive shooters and tactical users often clean and lubricate their rifles after every major session to maintain peak reliability.
2. Why is cleaning an AR-15 important?
Cleaning an AR-15 is essential because carbon buildup, dirt, and unburned powder residue can affect the rifle’s cycling and reliability. Over time, fouling can create excessive friction on moving parts, potentially causing failures to feed, extract, or eject. Regular cleaning also helps prevent corrosion, prolongs barrel life, and allows shooters to inspect wear components before serious problems develop.
3. What happens if you never clean an AR-15?
If an AR-15 is neglected for long periods, carbon and debris will accumulate in critical areas such as the bolt carrier group, chamber, and gas system. Eventually, this buildup can slow the rifle’s cycling speed and lead to malfunctions. Severe neglect may also increase wear on internal parts, reduce accuracy, and create corrosion issues, especially in humid environments.
4. Is the AR-15 difficult to clean?
No, the AR-15 is relatively easy to clean compared to many other rifle platforms. Its field-stripping process is straightforward, and most routine maintenance can be completed using basic cleaning tools. Once familiar with the process, many shooters can complete a standard cleaning in under an hour.
5. What is the dirtiest part of an AR-15?
The bolt carrier group (BCG) is usually the dirtiest part because it handles hot gases and carbon residue generated during firing. The bolt tail, gas key, and bolt face tend to accumulate the heaviest fouling and require the most attention during cleaning.
6. What tools are needed to clean an AR-15?
Basic cleaning tools include a cleaning rod, bore brush, cleaning patches, chamber brush, nylon brushes, cleaning solvent, and gun oil. Optional tools such as carbon scrapers, bore guides, and microfiber cloths can make the process easier and more effective.
7. What is CLP and why is it popular?
CLP stands for Clean, Lubricate, and Protect. It is popular because it combines multiple maintenance functions into one product. Many military and civilian shooters use CLP because it simplifies cleaning while also providing lubrication and corrosion protection.
8. Can you use WD-40 to clean an AR-15?
WD-40 is not recommended as a primary firearm lubricant or cleaner. While it may temporarily displace moisture, it does not provide the same level of lubrication or long-term protection as dedicated gun cleaning products.
9. Should you clean a brand-new AR-15 before shooting it?
Yes, it is generally recommended to clean and lubricate a new AR-15 before its first use. Manufacturers often apply protective oils or preservatives during shipping and storage, and these should be removed before firing.
10. How do you safely unload an AR-15 before cleaning?
Remove the magazine first, then pull the charging handle rearward and lock the bolt open. Visually and physically inspect the chamber to confirm the rifle is unloaded before beginning any maintenance procedures.
11. Why should ammunition be removed from the cleaning area?
Keeping live ammunition away from the cleaning workspace reduces the risk of accidental loading or negligent discharge during maintenance.
12. What is field stripping an AR-15?
Field stripping refers to breaking the rifle down into its primary components for routine maintenance. This usually includes separating the upper and lower receivers and removing the bolt carrier group and charging handle.
13. How do you remove the bolt carrier group?
After separating the receivers, pull the charging handle rearward and slide the bolt carrier group out of the upper receiver. It can then be disassembled for detailed cleaning.
14. Why is chamber-to-muzzle cleaning recommended?
Cleaning from the chamber end helps protect the muzzle crown, which is critical for maintaining accuracy. Damaging the crown can negatively affect bullet stability and precision.
15. What does carbon buildup do to an AR-15?
Carbon buildup increases friction between moving parts and can obstruct proper gas flow. Excessive fouling may eventually cause cycling problems, failures to extract, or sluggish bolt movement.
16. What are gas rings on an AR-15 bolt?
Gas rings are small metal rings located on the rear of the bolt. They help seal gas pressure inside the carrier during cycling. Worn gas rings can reduce reliability and should be inspected regularly.
17. How do you know if gas rings are worn out?
A common test involves extending the bolt and standing the carrier vertically on the bolt face. If the carrier collapses under its own weight, the gas rings may need replacement.
18. Should you scrape carbon off the bolt tail?
Yes, but carefully. Carbon buildup on the bolt tail can become thick over time, but aggressive scraping with metal tools can damage finishes or surfaces. Use proper carbon scraper tools or nylon brushes whenever possible.
19. Can over-cleaning damage an AR-15?
Yes, excessive scrubbing, harsh chemicals, or unnecessary disassembly can wear finishes and components over time. Cleaning should be thorough but not overly aggressive.
20. What is the best lubricant for an AR-15?
High-quality firearm lubricants specifically designed for semi-automatic rifles are generally best. Many shooters prefer lightweight synthetic oils that remain stable under heat and heavy use.
21. What does “run it wet” mean?
“Run it wet” refers to keeping the bolt carrier group visibly lubricated. AR-15 rifles typically function more reliably when key moving parts remain properly oiled during extended shooting sessions.
22. Can too much oil cause problems?
Yes, excessive oil can attract dirt, dust, and carbon buildup, eventually creating sludge-like residue that may interfere with rifle operation.
23. What happens if the rifle is under-lubricated?
Insufficient lubrication increases friction and wear between moving parts. This can cause sluggish cycling, increased heat, and premature wear on internal components.
24. How often should the barrel be cleaned?
Most shooters clean the barrel after every shooting session, especially after high round counts. Precision shooters may clean more frequently to maintain consistent accuracy.
25. What is copper fouling?
Copper fouling occurs when copper from bullet jackets deposits inside the barrel rifling. Excessive copper buildup can reduce accuracy over time.
26. How do you remove copper fouling?
Dedicated copper solvents are designed to dissolve copper residue inside the bore. Patches may appear blue or green when copper fouling is present.
27. Should the gas tube be cleaned?
The inside of the gas tube usually does not require direct cleaning because the high-pressure gases tend to self-clear minor residue. However, the gas system should still be inspected for damage or obstruction.
28. What is the purpose of a chamber brush?
A chamber brush is specifically designed to clean the chamber and locking lug recesses where carbon buildup commonly accumulates.
29. How do you clean the charging handle?
Use solvent and a nylon brush to remove carbon buildup from the rails and underside of the charging handle, then apply a light coat of lubricant.
30. Should you disassemble the trigger group?
Routine cleaning usually does not require full trigger group disassembly. Light brushing and lubrication are normally sufficient unless deep maintenance is necessary.
31. What parts need lubrication on an AR-15?
Key lubrication points include the bolt carrier rails, cam pin, bolt body, charging handle rails, and moving parts inside the lower receiver.
32. Can dirty magazines affect reliability?
Yes, dirty magazines can cause feeding issues and should be inspected and cleaned periodically, especially if exposed to dirt or sand.
33. How long does a typical AR-15 cleaning take?
A standard cleaning usually takes 30 minutes to an hour depending on experience level and how dirty the rifle is.
34. Do suppressed AR-15s require more cleaning?
Yes, suppressors increase carbon fouling and gas blowback, causing the rifle to become dirty much faster than unsuppressed setups.
35. Can improper cleaning damage accuracy?
Yes, improper cleaning methods such as damaging the barrel crown or overusing harsh tools can negatively affect accuracy.
36. What is a bore guide used for?
A bore guide helps align the cleaning rod properly and protects the chamber and bore from unnecessary wear during cleaning.
37. Is stainless steel cleaning equipment safe?
Some stainless tools are safe when used properly, but softer materials such as nylon or brass are generally preferred to reduce the risk of scratching firearm surfaces.
38. Why is lubrication important for reliability?
Lubrication reduces friction, minimizes wear, and allows moving components to cycle smoothly under heat and pressure.
39. Should you oil the inside of the barrel?
A light oil coating can help prevent corrosion during storage, but excess oil should be removed before firing.
40. Can dirt inside the lower receiver cause malfunctions?
Yes, excessive dirt or debris inside the trigger mechanism can interfere with trigger operation and reliability.
41. What should you inspect during cleaning?
Inspect gas rings, extractor condition, springs, firing pin wear, cracks, unusual wear patterns, and loose fasteners during routine maintenance.
42. Why does the AR-15 get dirty so quickly?
The direct impingement gas system vents hot gases directly into the bolt carrier group, causing rapid carbon buildup during firing.
43. Can environmental conditions affect cleaning needs?
Yes, rifles used in dusty, sandy, wet, or humid environments typically require more frequent maintenance and inspection.
44. Should cleaning patches come out perfectly white?
Not necessarily. Some discoloration may remain even after effective cleaning, especially in rifles with heavy use.
45. How do you prevent rust on an AR-15?
Regular cleaning, proper lubrication, and storing the rifle in a dry environment help prevent rust and corrosion.
46. Can carbon buildup affect accuracy?
Yes, excessive fouling inside the barrel and chamber can affect bullet consistency and overall shooting performance.
47. Is compressed air useful for cleaning?
Yes, compressed air can help remove dust and debris from hard-to-reach areas such as the trigger assembly and receiver corners.
48. Should the rifle be cleaned immediately after shooting?
Cleaning shortly after shooting is beneficial because carbon residue is generally easier to remove before it hardens.
49. What is the best cleaning routine for beginners?
Beginners should focus on safe unloading, field stripping, cleaning the barrel and bolt carrier group, and applying proper lubrication without overcomplicating the process.
50. Can an AR-15 function while dirty?
Yes, many AR-15 rifles can continue functioning while dirty if properly lubricated, but reliability eventually decreases as fouling accumulates.
51. Why do professional shooters clean their rifles regularly?
Professional shooters rely on consistency and reliability. Regular maintenance reduces the chance of malfunctions during competition or operational use.
52. How does maintenance extend rifle lifespan?
Cleaning removes abrasive fouling and moisture that can accelerate wear, helping preserve critical components over years of use.
53. Is a deep cleaning always necessary?
No, deep cleaning is usually only needed periodically or after heavy use. Routine maintenance is often enough for most shooters.
54. What is the most common AR-15 cleaning mistake?
Over-oiling and neglecting lubrication balance are among the most common mistakes made by AR-15 owners.
55. What is the best overall approach to AR-15 maintenance?
The best approach combines regular cleaning, proper lubrication, periodic inspection of wear parts, and consistent maintenance habits tailored to how the rifle is used.
Read more: