Learning how to shoot a deer is not simply a matter of placing a sight on an animal and pulling a trigger or releasing an arrow. A responsible hunter must first satisfy the law, know the limits of the equipment, identify the deer correctly, confirm a safe background, recognize an ethical shot angle, remain within a practiced effective range, and be prepared to recover and use the animal responsibly.
This guide is written for beginners using a legal deer-hunting firearm, bow, or crossbow. It focuses on calm decision-making, humane shot selection, field safety, recovery planning, and conservation-minded behavior. It does not replace an approved hunter education course, supervised range instruction, manufacturer guidance, or the current regulations for the place where you hunt.
Important Legal and Safety Notice Before You Hunt
Hunting regulations vary by country, state, province, county, season, species, land type, age, and weapon. Never assume that a rule from another location applies where you hunt. Before entering the field, consult the official wildlife authority responsible for your hunting area and review the complete current regulation booklet.
- License and education: Confirm hunting-license and hunter-education requirements.
- Permits and tags: Carry every required deer permit, tag, stamp, or digital authorization.
- Season and legal hours: Verify exact dates, legal shooting hours, sex or antler restrictions, and bag limits.
- Legal equipment: Check firearm, ammunition, bow, crossbow, broadhead, magazine, draw-weight, and equipment restrictions.
- Land access: Verify public-land boundaries, unit rules, parking restrictions, and written private-land permission where appropriate.
- Visibility clothing: Wear blaze orange or other required visibility clothing when the law or conditions call for it.
- Safe handling: Keep the muzzle in a safe direction, treat every firearm as loaded, keep your finger outside the trigger guard until ready, and positively identify the target and background.
- Emergency planning: Check weather, carry navigation and first-aid equipment, tell someone your plan, and establish a return time.
Hunters in North America can use the Association of Fish & Wildlife Agencies member directory to locate the appropriate state, provincial, or territorial wildlife agency. Hunters on U.S. Fish and Wildlife Service property must also review the rules for the specific refuge or unit.
What Makes a Deer Shot Safe, Legal, and Ethical?
An ethical shot is more than an aiming point. It is a complete decision in which the hunter has controlled every factor that can reasonably be controlled. Passing on a doubtful opportunity is not failure; it is one of the clearest signs of sound judgment.
The Go/No-Go Shot Checklist
Do not shoot unless every answer below is yes:
- Is the animal positively identified as a deer?
- Is this individual legal under the current permit, season, sex, age, or antler rules?
- Am I on land where I may lawfully hunt from this exact position?
- Is the hunting method legal here and now?
- Is the deer clearly visible rather than partly hidden by brush?
- Is the deer standing still or moving so slowly that I can wait for it to stop?
- Is the shot angle appropriate for my equipment and experience?
- Is the deer within my proven effective range?
- Do I have a steady shooting position?
- Is there a safe backstop, with no person, road, building, livestock, vehicle, trail, or unseen area beyond the target?
- Can I recover the deer without trespassing or entering a closed area?
- Am I prepared to tag, report, transport, and care for the harvest correctly?
If one answer is no or uncertain, keep the weapon pointed safely and wait. Deer often change position. A few seconds of patience may turn a poor opportunity into a clear one, while an uncertain shot can create a safety emergency or a difficult recovery.
Understanding Deer Anatomy and Shot Angles
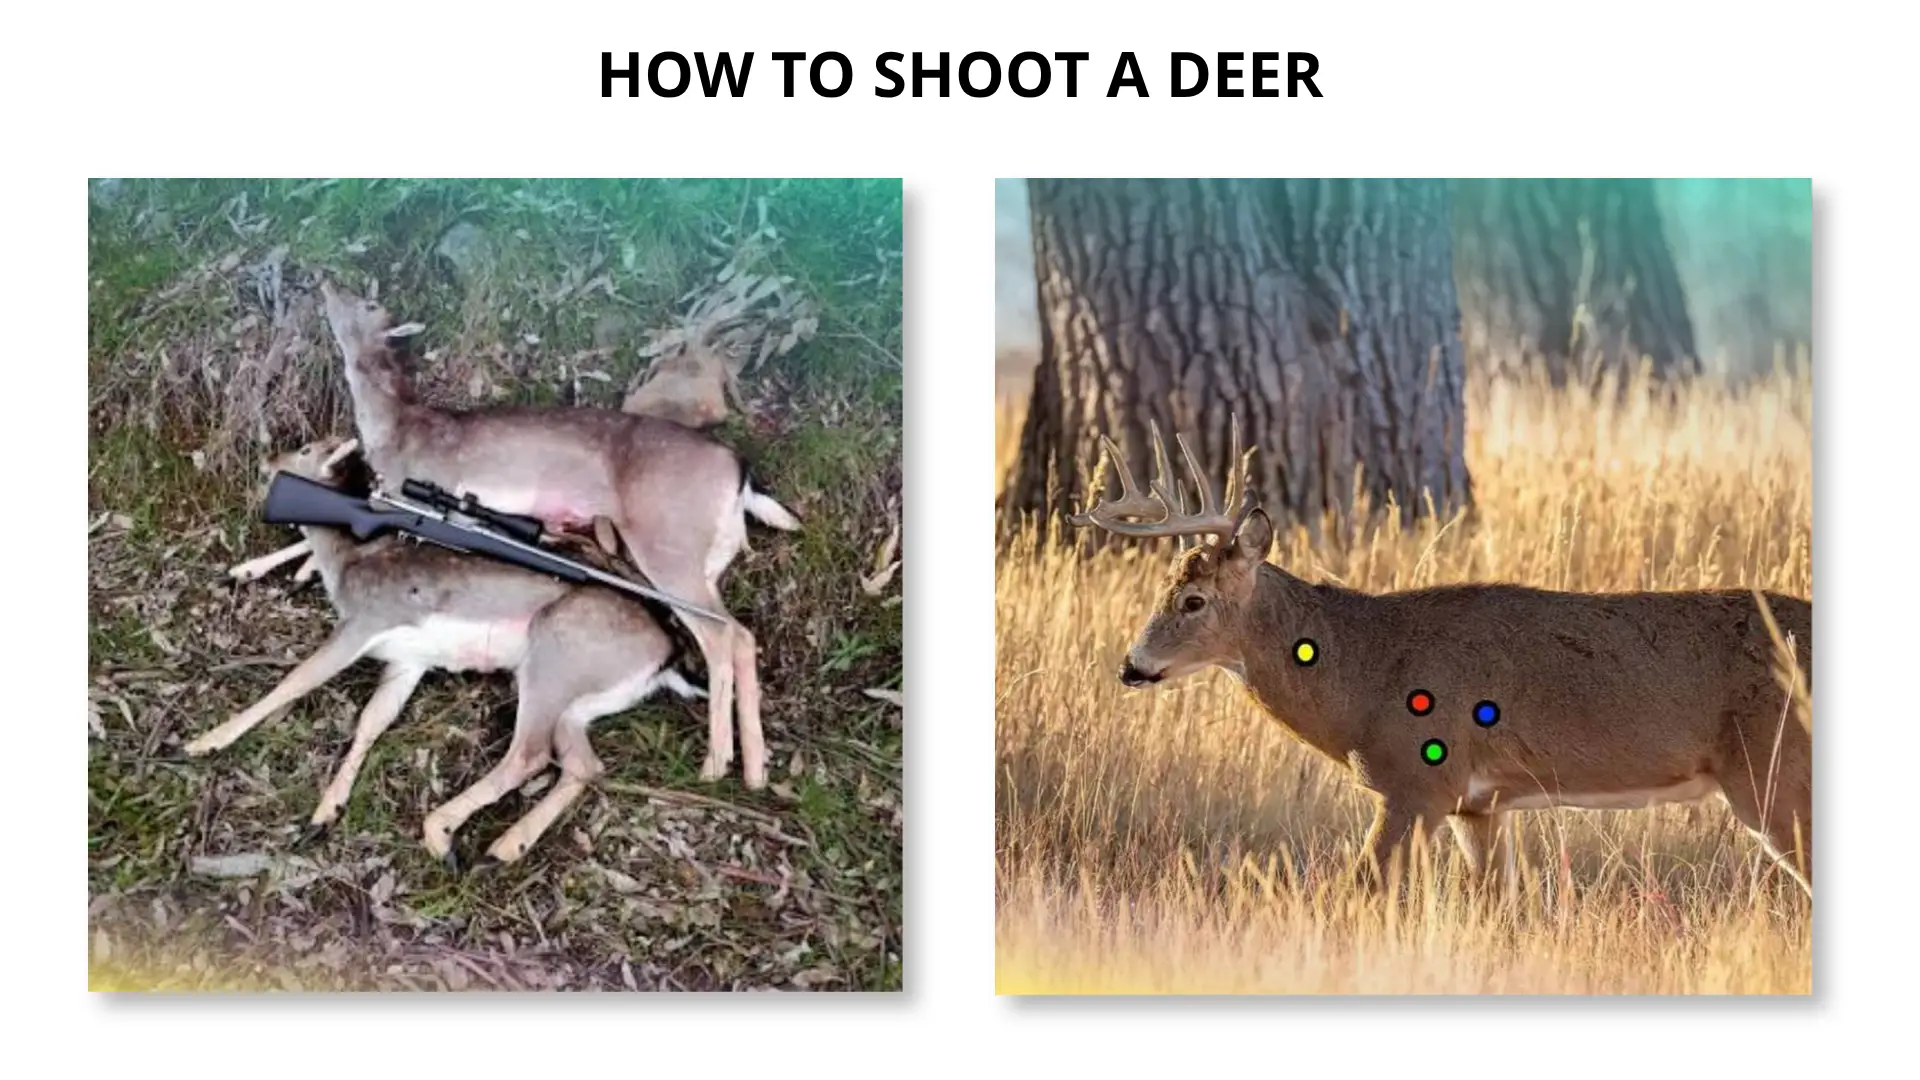
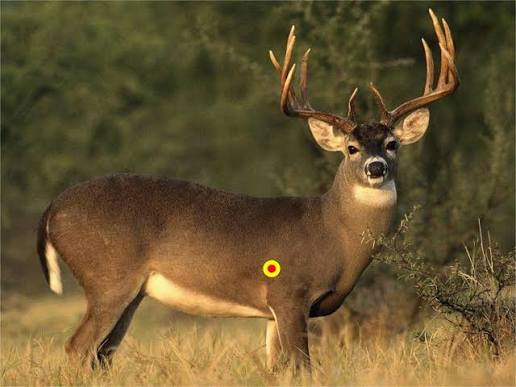
For deer-sized game, the preferred target is the chest vital area containing the lungs, heart, and major blood vessels. From a broadside view, this area sits behind the front shoulder and occupies a much larger, more forgiving zone than the head or neck. Hunter-education materials commonly emphasize the chest because it offers the best combination of reliability, humane results, and recoverability.
Where Should a Beginner Aim on a Broadside Deer?
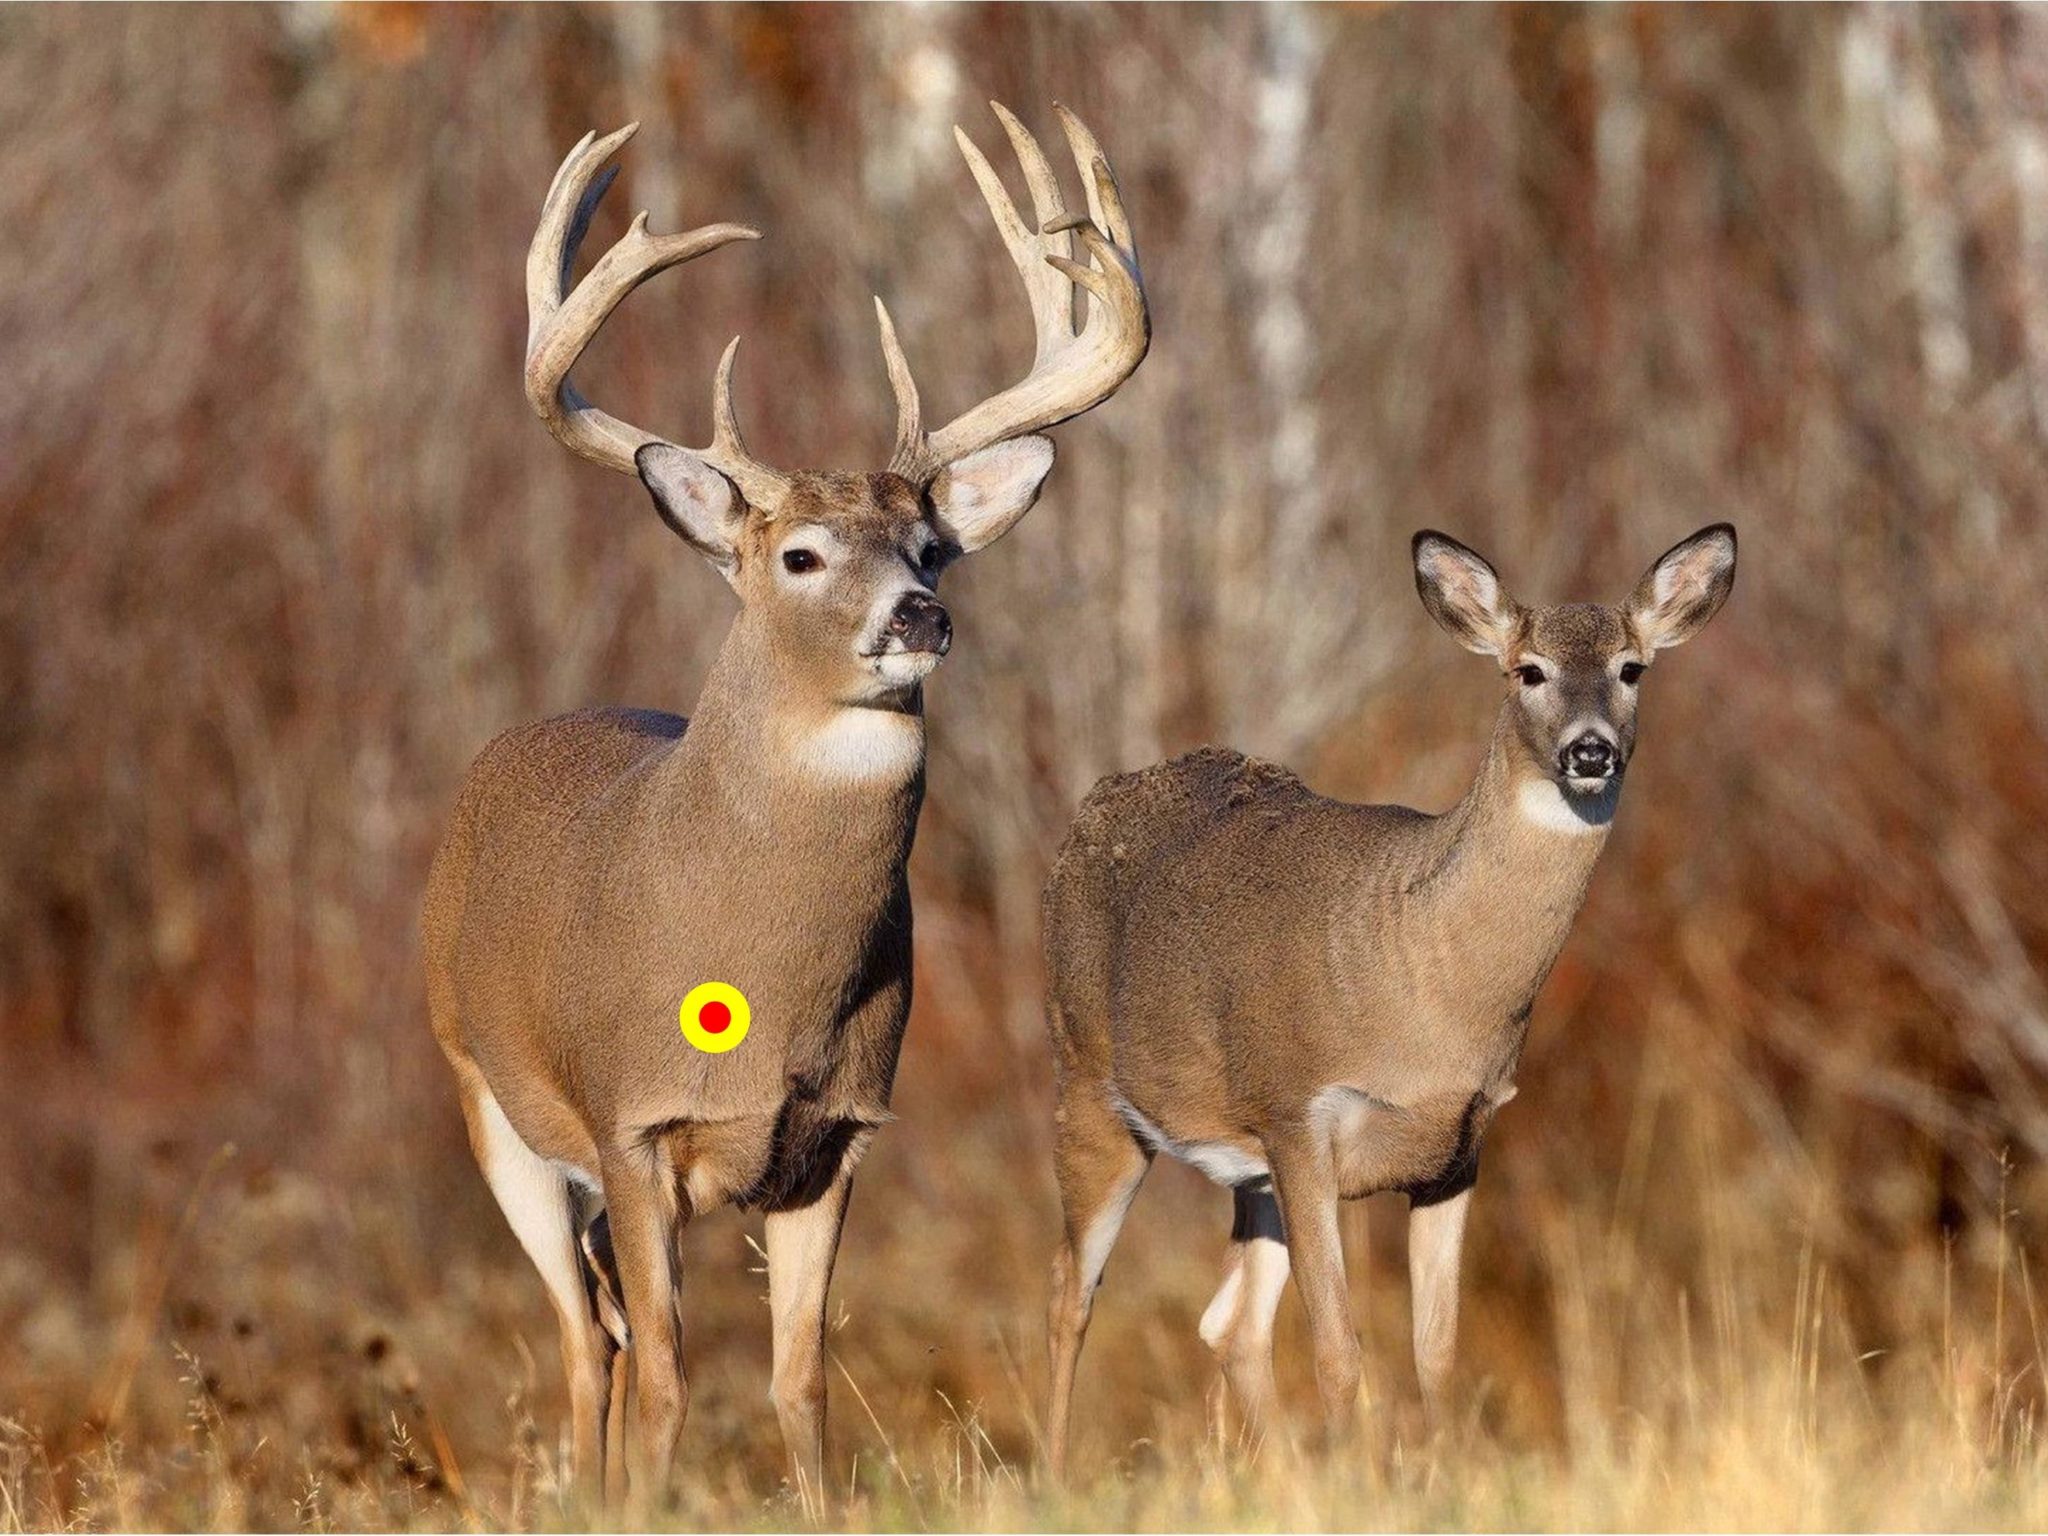
On a calm deer standing broadside, place the aiming point in the chest vital zone immediately behind the front shoulder, around the middle-to-lower portion of the chest rather than near the belly line or high along the back. The exact sight picture changes with body size, posture, elevation, and equipment, so study deer anatomy diagrams and practice on life-size or three-dimensional targets before hunting.
Do not aim at a spot on the hide without thinking about the path through the body. Visualize where the projectile should enter and where it would exit. This is especially important when the deer is quartering or when the hunter is elevated.
Shot-Angle Decision Table
| Deer Position | Beginner Decision | Why | General Aiming Concept |
|---|---|---|---|
| Broadside and standing still | Preferred | The chest vital area is clearly presented and the shot path is easier to visualize. | Aim in the chest vital zone just behind the front shoulder. |
| Slightly quartering away | Acceptable with practice | The near shoulder moves out of the way and the path can cross the chest. | Visualize a line through the chest toward the far-side front leg or shoulder. |
| Sharply quartering away | Usually pass | The visible target narrows and the path may enter too far back. | Wait for a more open angle. |
| Quartering toward | Pass, especially with a bow | The near shoulder and heavy bone reduce the margin for error. | Wait for broadside or slight quartering away. |
| Facing directly toward you | Pass | The vital target is narrow and the background may be difficult to judge. | Let the deer turn. |
| Facing directly away | Pass | This offers a poor and unnecessarily risky shot path. | Wait for a side angle. |
| Head or neck presentation | Pass | These are small, mobile targets with a high risk of severe wounding from a slight error. | Choose the larger chest vital zone instead. |
| Running, obscured, or on a ridge crest | Do not shoot | Movement, cover, and an unknown background make the opportunity unsafe or unreliable. | Keep the weapon safe and wait. |
Why Head and Neck Shots Are Poor Choices for Beginners
The head and neck move frequently and provide very little margin for error. A small mistake may cause a serious wound without producing a quick recovery. A larger chest target is the more responsible choice. The same principle applies to hurried frontal, rear, or heavily obstructed shots.
How Elevation Changes the Shot Path
From a tree stand or steep hillside, the visible aiming point and the internal path are not identical. The projectile travels at an angle through the body, so visualize the route to the far side of the chest rather than simply aiming at the same surface location used from level ground. Practice from an elevated platform only at a properly managed range, and always use a full-body fall-arrest harness when hunting from a tree stand.
Firearm and Bow Shot Placement: What Changes?
The ethical target remains the chest vital area, but firearms and bows perform differently. A hunter should not assume that an angle acceptable with one method is automatically suitable with another.
Firearm Considerations
- Use only a firearm and ammunition combination that is legal for deer where you hunt.
- Read the manufacturer’s manual and learn the firearm’s controls before entering the field.
- Confirm the sight setting at a supervised range before the season.
- Use a stable rest whenever possible rather than attempting an unsupported shot.
- Never use a riflescope as a substitute for binoculars when identifying movement.
- Remember that a bullet may travel far beyond the deer. A safe earthen backstop is essential.
- Unload before climbing, crossing obstacles, entering a vehicle, or raising the firearm to a tree stand with a haul line.
Bow and Crossbow Considerations
- Verify legal season, draw-weight, broadhead, crossbow, and equipment requirements.
- Keep broadheads covered in a secure quiver during transport and movement.
- Practice until drawing, anchoring, aiming, and releasing can be done quietly and consistently.
- Know the exact distance and your personal effective range; arrows have a more arcing trajectory than firearm projectiles.
- Wait for broadside or slight quartering-away shots and avoid quartering-toward angles.
- Check branches, grass, blind windows, and other objects that could deflect the arrow.
- Use a haul line for an uncocked crossbow or securely cased bow as directed by the manufacturer and local rules.
One Rule Applies to Every Method
Your equipment does not define your effective range—your demonstrated accuracy under realistic conditions does. Weather, position, fatigue, light, angle, and nerves can make a field shot harder than a range shot. Reduce the distance or pass whenever conditions exceed your practiced ability.
Prepare Before You Try to Shoot a Deer
Complete Hunter Education
An approved hunter education course teaches far more than marksmanship. It covers safe handling, wildlife identification, laws, ethics, survival, first aid, landowner relations, shot selection, and conservation. Many jurisdictions require certification before a first hunting license can be purchased. Even where it is optional, a beginner should complete the course and, when possible, hunt with an experienced ethical mentor.
Learn Your Equipment at a Supervised Range
Practice begins with safe loading and unloading, muzzle control, use of the safety, trigger discipline, sight alignment, and proper storage. Follow range commands and the manufacturer’s instructions. For a firearm, confirm that the sights are properly aligned for the ammunition being used. For a bow, confirm tune, arrow compatibility, broadhead flight, and safe draw weight with qualified help.
Build a Stable Shooting Position
The most reliable field positions use support. A solid bench may be appropriate for initial sight-in, but hunting practice should also include a supported kneeling, seated, standing, blind-rest, or tree-stand position that matches the intended hunt. Never rest a firearm directly on a hard surface in a way the manufacturer or instructor considers unsafe, and never allow the barrel or bow limbs to contact an obstruction.
Define Your Personal Effective Range
There is no universal ethical distance. Your effective range is the maximum distance at which you can repeatedly place every practice shot inside a realistic deer vital-zone target from the position, clothing, and support you will use in the field. Test on calm days and in moderate, safe conditions. Shorten that distance when wind, cold, awkward angles, low light, fatigue, or excitement reduce control.
Practice the Decision, Not Just the Shot
Use deer targets showing broadside, quartering-away, quartering-toward, and frontal positions. For each image, decide whether to shoot or pass before aiming. Include no-shoot scenarios with brush, a ridge line, another hunter, livestock, a building, or an uncertain animal. Ethical judgment must become as automatic as trigger or release control.
Scout for a Safe Setup
Scouting helps you find game trails, tracks, droppings, rubs, scrapes, feeding areas, bedding cover, water, funnels, and travel corridors. It also helps you map property boundaries, roads, trails, neighboring homes, livestock areas, and possible shooting directions. Choose a setup that offers a safe backstop and recovery access, not simply the highest amount of deer sign.
How to Shoot a Deer: Step-by-Step Guide
Step 1: Verify the Law for This Hunt
Before leaving home, confirm the license, permit, tag, season, legal hours, hunting unit, bag limit, antler or sex restrictions, weapon rules, visibility clothing, baiting rules, reporting deadline, and transport requirements. Save the official regulations offline or carry a paper copy if service may be unavailable.
Step 2: Inspect and Secure Your Equipment
Check that the firearm or bow is in safe working condition, the sights are secure, and all manufacturer-recommended inspections are complete. Carry ammunition or arrows approved for the equipment and legal for deer. Transport and store the weapon as required by law, with safeguards against unauthorized access.
Step 3: Plan Access, Wind, and a Safe Field of Fire
Use a current map to verify boundaries and legal access. Plan an entry route that avoids occupied buildings, livestock, roads, popular trails, and other hunters. Approach with the wind carrying human scent away from the expected deer movement when practical. Identify directions that are never safe for a shot.
Step 4: Set Up Without Creating a New Hazard
In a ground blind, keep the muzzle or broadhead clear of fabric and other people. In a tree stand, wear a full-body harness from the time your feet leave the ground until you return, maintain secure contact, and raise an unloaded firearm or other equipment with a haul line. Never climb with a loaded firearm or a nocked arrow ready to shoot.
Step 5: Observe With Binoculars
Use binoculars to identify movement, not the firearm’s scope. Confirm that the animal is a deer and determine whether it is legal. Look for other deer, hunters, hikers, homes, roads, vehicles, livestock, fences, and terrain behind or near the animal.
Step 6: Wait for the Right Presentation
The best beginner opportunity is a relaxed deer standing broadside. A slight quartering-away angle can also provide a clear chest path when the hunter understands the anatomy. Do not force a shot at a moving, alert, obstructed, frontal, rear-facing, head-on, steeply angled, or ridge-line deer.
Step 7: Confirm the Distance and Your Limit
Estimate or measure the distance with a legal rangefinder where permitted. Compare it with the effective range established during practice. If you are unsure of the distance, wind, trajectory, or angle, do not shoot. Moving closer legally or waiting for a closer opportunity is better than guessing.
Step 8: Build the Steadiest Position Available
Use a shooting rail, pack, sticks, tree, or another safe support when appropriate. Set your feet or body position before shouldering the firearm or drawing the bow. Avoid balancing, twisting, leaning outside a stand, or shooting from an unstable surface.
Step 9: Recheck Target, Foreground, and Background
Before touching the trigger or beginning the final bow sequence, confirm the legal deer again. Check the foreground for branches or grass and the background for people, roads, buildings, livestock, vehicles, trails, water, rock, hard surfaces, or terrain that does not safely stop the projectile. Never shoot at sound, color, or movement alone.
Step 10: Choose the Chest Vital Zone
For a broadside deer, settle the sight in the chest vital area just behind the front shoulder. For a slight quartering-away deer, visualize the projectile path through the chest toward the far-side front leg. Avoid aiming at the head, neck, spine line, rear, or an area obscured by brush.
Step 11: Control the Shot
Keep the muzzle safe and the finger outside the trigger guard until the sights are on the chosen point and the decision to shoot is final. With a firearm, take a normal breath, let part of it out, hold briefly without straining, and press the trigger smoothly while maintaining the sight picture. With a bow, use the practiced anchor, maintain steady pressure, and make a controlled release rather than punching or jerking. Do not rush because the deer may move.
Step 12: Follow Through and Observe
Keep looking through the sights or along the bow’s line after the shot. Note the deer’s reaction without assuming what it means. Mark the exact place where the deer stood and the last location where it was visible. Use fixed landmarks such as a distinctive tree, rock, opening, or trail crossing.
Step 13: Make the Firearm or Bow Safe
Keep the muzzle pointed safely and remain aware of other animals and hunters. Engage the safety when appropriate, control the weapon, and reload only if lawful and necessary for an immediate, safe follow-up. Never run with a loaded firearm or move recklessly in excitement.
Step 14: Begin Recovery Deliberately
Do not rush blindly to the last location. Observe, listen, and review what you saw. The appropriate waiting and tracking approach depends on the shot, equipment, weather, visibility, terrain, and local guidance. When uncertain, contact an experienced mentor, game warden, or legal tracking service rather than pushing the deer or crossing a property boundary without permission.
Step 15: Tag, Report, and Care for the Harvest
Follow the exact local sequence for validating or attaching a tag, moving the animal, recording harvest information, and reporting. Wear disposable gloves, use clean tools, avoid contamination, and begin cooling the meat as soon as conditions and law allow. Follow official food-safety guidance and use a reputable processor when you do not yet have the skills or facilities to handle the animal properly.
Best Time, Place, and Conditions for a Responsible Shot
The best opportunity is not necessarily the first deer you see. It is the moment when the legal animal is calm, clearly visible, within range, and standing at a suitable angle with a safe background.
Time of Day
Deer are often active near transitions between cover, feeding areas, and bedding locations, particularly around lower-light periods. However, legal shooting hours vary and must control your decision. Stop hunting when you can no longer identify the deer and background with complete confidence, even if legal time has not technically ended.
Wind
Wind affects both deer detection and projectile flight. Set up so your scent is less likely to blow toward expected movement, but never allow a favorable scent wind to justify an unsafe shooting direction. Strong or inconsistent crosswinds may require a shorter range or a complete pass.
Weather
Rain, snow, fog, heat, cold, and high wind can reduce visibility, footing, accuracy, tracking conditions, navigation reliability, and meat-cooling options. Check the forecast and turn back when weather exceeds your clothing, equipment, skill, or emergency plan.
Hunting Pressure
On busy public land, assume other people may be nearby even when you cannot see them. Wear required visibility clothing, avoid shooting toward access roads or trails, communicate respectfully at parking areas, and never rely on a familiar spot being empty.
Public and Private Land
On public land, verify boundaries, special unit rules, stand restrictions, parking, trail access, and other-user activity. On private land, obtain clear permission, discuss boundaries and livestock, close gates, avoid crops and equipment, and agree on how to request access if a deer crosses onto neighboring property.
Recommended Deer Hunting Gear and Tools to Consider
You do not need the most expensive equipment to hunt responsibly. Choose equipment according to local law, hunting method, terrain, weather, safety needs, skill level, and budget.
- Valid license, permits, tags, regulation booklet, and private-land permission
- Legal deer-hunting firearm, bow, or crossbow in safe working condition
- Legal ammunition, arrows, and broadheads compatible with the equipment
- Binoculars for target identification
- Rangefinder where legal and useful
- Weather-appropriate layers, quiet outerwear, gloves, and sturdy boots
- Blaze orange or other required visibility clothing
- Map, compass, GPS, or offline hunting map with verified boundaries
- Headlamp and backup light used only in compliance with hunting laws
- Charged phone, battery bank, whistle, and emergency communication plan
- First-aid kit, water, food, and emergency insulation
- Full-body fall-arrest harness for any elevated stand
- Haul line for raising and lowering unloaded equipment
- Disposable gloves, clean knife, game bags, clean wipes, and cooler capacity
- Flagging or another legal, removable way to mark a recovery route
Helpful Tips for Better Results
- Practice from field positions: A bench confirms equipment; supported field positions confirm hunting ability.
- Set a conservative distance limit: Leave a margin for cold, wind, excitement, and imperfect footing.
- Preselect safe shooting lanes: Decide in advance where you may and may not shoot.
- Use binoculars first: Never point a firearm at an object merely to identify it.
- Wait for stillness: A feeding or walking deer may pause if you remain calm.
- Visualize the exit point: Think through the chest, not just at the visible hide.
- Keep recovery supplies ready: A plan made before the shot reduces mistakes afterward.
- Record field notes: Wind, weather, time, deer movement, and setup details improve future decisions.
- Hunt with a mentor: A careful, experienced hunter can help a beginner recognize when not to shoot.
Common Mistakes to Avoid
- Skipping current regulations: Rules can change between seasons and may differ across nearby units.
- Using the scope for identification: This points a firearm toward something not yet confirmed as a target.
- Shooting without a backstop: A deer does not stop every projectile.
- Choosing distance by equipment claims: Marketing or another hunter’s ability does not define your range.
- Rushing a moving deer: Movement changes angle and aiming point unpredictably.
- Aiming at the head or neck: These small, mobile targets provide little margin for error.
- Ignoring branches and blind edges: Small obstructions can alter the shot or damage equipment.
- Leaning outside a tree stand: No shot is worth a fall.
- Failing to mark the deer’s location: Ground-level perspective can make a familiar spot difficult to find.
- Crossing property lines during recovery: Permission may still be required even when following a wounded deer.
- Delaying meat cooling: Warm conditions require a prepared, lawful meat-care plan.
- Letting excitement override judgment: Pause and repeat the go/no-go checklist.
Troubleshooting Common Problems
| Problem | Possible Cause | What to Do |
|---|---|---|
| You cannot hold the sight steady | Poor support, fatigue, cold, excitement, or too much magnification | Lower the weapon safely, breathe, improve the rest, reduce magnification if appropriate, or pass. |
| The deer will not stop | Normal travel, alert behavior, or hunting pressure | Do not swing or rush. Wait quietly for a natural pause or let the deer go. |
| The angle is unclear | Brush, darkness, uneven terrain, or the deer is partly turned | Do not guess. Wait for broadside or slight quartering away in clear view. |
| You are unsure of the distance | No reference point, unfamiliar terrain, or limited light | Use a legal rangefinder, pre-range landmarks, move closer lawfully, or pass. |
| Wind is stronger than expected | Open terrain, gusts, changing weather, or elevation | Shorten the range, wait for calm conditions, reposition safely, or end the hunt. |
| Other hunters or recreationists appear | Shared public land or an access route you did not notice | Unload or make the weapon safe as appropriate, communicate calmly, and change direction or location. |
| The deer is on a ridge | No visible backstop beyond the animal | Never shoot. Wait until the deer moves in front of safe terrain. |
| A branch crosses the chest | Obstructed shooting lane | Do not attempt to “thread” the shot. Wait for a completely clear path. |
| You feel shaky or rushed | Adrenaline, cold, awkward posture, or fear of losing the opportunity | Lower the weapon safely, reset your position and breathing, and shoot only if control returns. |
| You cannot find the last location | Poor landmarking or changed ground-level perspective | Return to the shooting position, reconstruct the line, use fixed landmarks, and seek experienced help. |
| The recovery trail reaches private land | The deer crossed a property boundary | Stop at the boundary and obtain permission or contact the appropriate authority. Do not trespass. |
| You are uncertain about a rule | Outdated memory, unclear map, or conflicting advice | Do not hunt until the official wildlife agency or conservation officer clarifies the rule. |
After the Shot: Recovery, Reporting, and Meat Care
Stay Oriented
Remain at the shooting position long enough to mark where the deer stood, its direction of travel, and the last visible point. Save a map pin if lawful and reliable, but also use physical landmarks because electronic devices can fail.
Choose a Recovery Approach
Recovery timing is not one-size-fits-all. It depends on the observed shot, equipment, weather, terrain, local law, and available tracking resources. A hurried approach can make recovery harder. When evidence is uncertain, obtain guidance from an experienced mentor, conservation officer, or legal tracking service.
Respect Boundaries
A hunting license does not normally grant access to private property. Stop at the boundary, unload or secure the weapon as required, and seek permission. Contact a conservation officer when local law provides a specific recovery process or the landowner cannot be reached.
Approach Carefully
Approach from a safe direction while controlling the weapon. Do not assume an animal is dead from appearance alone. Follow official hunter-education guidance for confirming the animal’s condition and for any lawful follow-up action. Avoid handling an animal that appears sick or abnormal; contact the wildlife agency for instructions.
Tag and Report in the Required Order
Some jurisdictions require immediate tag validation or attachment before the deer is moved, while others use electronic systems. Reporting deadlines also vary. Follow the exact current sequence for the place you hunt and retain confirmation numbers or records.
Protect the Meat
Wear clean disposable gloves, use sanitized tools, avoid contamination, and cool the meat promptly. Warm weather, long pack-outs, and distant processors require extra planning. Follow official wild-game food-safety advice, local transport rules, and any disease-testing recommendations for the area.
Review the Hunt
After equipment is unloaded, cleaned, and stored securely, write down the date, weather, wind, location, range, shot angle, deer behavior, recovery details, and lessons learned. Honest review is one of the fastest ways to improve judgment.
Ethical Hunting and Conservation
Responsible deer hunting connects personal field skill with wildlife stewardship. Seasons, permits, harvest limits, and reporting systems are management tools. Accurate harvest data helps agencies understand populations and make future decisions. License and equipment-related funding also supports wildlife management, habitat work, public access, research, and hunter education in many jurisdictions.
- Obey seasons, limits, reporting requirements, and lawful-method rules.
- Pass on unsafe, unclear, or low-confidence shots.
- Respect landowners, other hunters, hikers, livestock, and nearby residents.
- Use as much of the legally harvested animal as practical and avoid waste.
- Report sick-looking deer or suspected wildlife violations through the proper authority.
- Pack out litter, flagging, spent cases where safe to retrieve, and other materials.
- Do not damage trees, crops, gates, roads, signs, or habitat.
- Share accurate safety information with new hunters and reject reckless behavior.
When to Get More Training or Professional Guidance
Seek hands-on help before hunting when any of the following applies:
- You have never safely handled the firearm, bow, or crossbow you plan to use.
- You have not completed an approved hunter education course.
- You cannot load, unload, carry, and store the equipment confidently.
- You have not confirmed sights or practiced from realistic field positions.
- You cannot identify deer anatomy and common shot angles.
- You are uncertain about boundaries, access rights, or local regulations.
- You plan to use a tree stand but have not practiced with a full-body harness.
- You are unfamiliar with the terrain, weather risks, or emergency communication limits.
- You do not have a lawful recovery, transport, and meat-care plan.
Good sources of instruction include official hunter education programs, state or provincial wildlife agencies, certified firearm or archery instructors, range officers, conservation organizations, reputable hunting clubs, and experienced mentors known for safe and ethical behavior.
Official Resources Worth Using
- Association of Fish & Wildlife Agencies: agency directory
- U.S. Fish and Wildlife Service: hunting on federal refuge lands and waters
- Wisconsin DNR: firearm safety and target identification
- NSSF: rules of safe firearm handling
- Pennsylvania Game Commission: safe hunting and tree-stand guidance
- Hunter-ed.com: big-game vital-zone education
- Washington Department of Fish and Wildlife: wild-game food safety
Use these as general educational references. Your own wildlife agency and the current rules for the exact property remain the controlling sources.
Final Thoughts
Knowing how to shoot a deer responsibly means knowing when not to shoot. Complete hunter education, verify current regulations, practice until your effective range is proven, use binoculars for identification, wait for a calm broadside or slight quartering-away presentation, aim at the chest vital zone behind the front shoulder, and confirm a safe foreground and backstop before acting.
A legal harvest is only part of the responsibility. Careful recovery, tagging, reporting, meat handling, landowner respect, and honest review all matter. Choose equipment and methods that match local law, terrain, weather, and personal skill. Patience and restraint will make you a safer hunter and a more trustworthy participant in wildlife conservation.
Frequently Asked Questions
1. Where should a beginner aim on a deer?
On a calm broadside deer, a beginner should aim at the chest vital area just behind the front shoulder, around the middle-to-lower portion of the chest. Study anatomy diagrams and practice on realistic targets before hunting.
2. What is the best shot angle on a deer?
A broadside, standing deer provides the clearest and most forgiving chest presentation. A slight quartering-away angle can also be ethical when the hunter can visualize a path through the chest and is within a proven effective range.
3. What does “broadside” mean?
Broadside means the deer’s side is facing the hunter, roughly perpendicular to the line of the shot. Both front legs and the side of the chest are usually visible.
4. What is a quartering-away shot?
The deer is angled slightly away, so its near shoulder is farther forward and the chest path opens toward the far-side front leg. Mild quartering-away angles can be suitable, while steep angles reduce the target and should usually be passed.
5. Should a beginner shoot a deer quartering toward them?
No. The near shoulder and heavy bone reduce the margin for error. Bowhunters should avoid this angle, and beginners using firearms are better served by waiting for broadside or slight quartering away.
6. Is a frontal shot on a deer ethical?
A frontal shot offers a narrow target and little margin for error. This beginner guide recommends passing and waiting for the deer to turn.
7. Should you shoot a deer in the head?
No. The head is small and moves often, so a minor aiming error can cause severe injury without reliable recovery. The larger chest vital area is the responsible target.
8. Is a neck shot a good choice?
Not for a beginner. The critical target is small, movement is common, and error can lead to serious wounding. Wait for a clear chest shot.
9. Can you shoot a deer that is facing directly away?
No. A rear-facing deer presents a poor shot path. Wait for it to turn broadside or slightly quartering away.
10. Should you shoot a running deer?
Beginners should not shoot at running deer. Movement changes the aiming point and angle rapidly, while increasing the risk to the animal and anything beyond it.
11. Should you shoot through brush?
No. Branches, grass, and blind material can deflect a bullet or arrow. Wait for a completely clear path to the chest and a safe background.
12. Can you shoot a deer standing on a hilltop?
Do not shoot when the deer is silhouetted on a ridge or hill crest because you cannot confirm what lies beyond it. Wait until safe terrain forms a reliable backstop.
13. Does rifle shot placement differ from bow shot placement?
Both methods target the chest vital area, but angle tolerance and projectile behavior differ. Bowhunters generally need a clearer broadside or slight quartering-away path and must be especially cautious about bone and obstructions.
14. How far should a beginner shoot a deer?
There is no universal distance. Shoot only inside the maximum distance at which you can repeatedly keep every practice shot in a realistic vital-zone target from the same position and under similar conditions.
15. How do you determine your effective range?
Practice from field positions using hunting clothing, support, and realistic targets. Your effective range ends where consistency ends. Shorten it further for wind, cold, low light, fatigue, steep angles, or excitement.
16. Do you need a rangefinder?
A legal rangefinder can reduce distance-estimation error, especially for archery. It does not replace practice, a safe background, or judgment. Check local rules because electronic-device restrictions vary.
17. What is the steadiest field shooting position?
A supported position is generally steadier than an unsupported one. Use a safe rail, shooting sticks, pack, tree, or other stable rest that you have practiced with, without leaning or creating a fall hazard.
18. How should you breathe before a firearm shot?
Take a normal breath, release part of it, and pause briefly without straining while pressing the trigger smoothly. If the sight does not settle, lower the firearm safely and reset rather than forcing the shot.
19. Should you use a riflescope to identify a deer?
No. Use binoculars. Pointing a firearm at an object that has not been positively identified violates a fundamental safety principle.
20. What must you check beyond the deer?
Look for people, hunters, hikers, roads, trails, houses, vehicles, livestock, equipment, hard surfaces, water, and terrain that may not stop the projectile. If the background is uncertain, do not shoot.
21. What if another deer is standing behind the target deer?
Do not shoot. A projectile may pass through the first deer and strike the second. Wait until the deer are separated and the full background is safe.
22. Is low-light shooting safe?
Only when it is within legal hours and you can positively identify the deer, its legal status, the aiming area, the foreground, and the background. Stop earlier than the legal cutoff when visibility is not sufficient.
23. What safety equipment is required in a tree stand?
Use a properly fitted full-body fall-arrest harness connected from the time your feet leave the ground until you return. Inspect the stand and harness, maintain secure contact, and raise unloaded equipment with a haul line.
24. Is a ground blind safer than a tree stand?
A ground blind removes fall risk but creates other hazards, including confined muzzle movement, obstructed windows, fabric near broadheads, and limited visibility. Establish safe shooting lanes and communicate clearly with companions.
25. Do deer hunters need blaze orange?
Requirements vary by location, season, weapon, and land type. Wear the exact amount and placement required by current regulations, and consider additional visibility when sharing land with other users.
26. Do you need a hunting license and deer tag?
Usually, but the exact combination depends on jurisdiction, age, residency, season, and property. Verify licenses, permits, tags, stamps, lotteries, and exemptions with the official wildlife agency.
27. Can you hunt deer on public land?
Yes where deer hunting is officially open, but each property may have separate seasons, access points, weapon zones, stand rules, parking, and reporting requirements. Verify the boundary and unit-specific rules.
28. Can you hunt deer on private land without permission?
No. Obtain lawful permission and understand boundaries, gates, crops, livestock, buildings, and any written conditions. Ownership of nearby land or a hunting license does not authorize entry.
29. What should you do immediately after the shot?
Keep the weapon controlled, follow through, observe the deer, and mark where it stood and where it was last seen. Avoid immediate, reckless pursuit.
30. How long should you wait before tracking a deer?
There is no single waiting time for every shot. The correct approach depends on what you observed, equipment, weather, terrain, and local guidance. When unsure, seek experienced or official help before following the trail.
31. What if a deer crosses onto private property?
Stop at the boundary and obtain permission. Contact a conservation officer or local authority when required or when the landowner cannot be reached. Do not trespass during recovery.
32. Can a tracking dog be used?
Rules vary widely. Some places allow licensed or leashed tracking dogs, while others restrict them. Check the official regulation and use a reputable legal service.
33. When should you attach or validate a tag?
Follow the exact local rule. Some jurisdictions require immediate validation or attachment before moving the deer; others use electronic confirmation. Never rely on another state’s procedure.
34. Is harvest reporting mandatory?
It is mandatory in many jurisdictions and deadlines vary. Report through the official system and retain the confirmation number or record.
35. How should deer meat be cared for?
Use clean gloves and tools, prevent contamination, and cool the meat promptly. Warm weather and long transport require advance planning. Follow official food-safety and disease-testing guidance.
36. What if the deer looks sick?
Do not handle or consume an animal that appears abnormal without guidance. Note the location and contact the wildlife agency for instructions about reporting, testing, or disposal.
37. Should a first-time hunter go alone?
A beginner is usually safer and learns faster with an experienced ethical mentor. Always tell someone where you are going, your route, and when you expect to return.
38. What is the biggest beginner mistake?
The biggest mistake is allowing excitement to replace the go/no-go checklist. Legal status, target identification, angle, range, stability, foreground, background, and recovery access must all be confirmed.
39. Does expensive gear make deer shooting easier?
Reliable, properly fitted equipment helps, but price does not replace training, judgment, safe handling, realistic practice, and patience. Use legal gear you understand and can operate consistently.
40. How does ethical deer hunting support conservation?
Regulated hunting can provide population data, management funding, and support for habitat and public access. Its conservation value depends on hunters following science-based regulations, reporting accurately, avoiding waste, and respecting wildlife and land.
Read more: How to Hunt Elk on Public Land: A Beginner-Friendly Guide