Learning how to hunt mule deer requires legal preparation, safe equipment handling, physical readiness, patient glassing, careful route planning, and realistic shot discipline. Mule deer often live in open, broken country where hunters must use terrain, wind, optics, and time rather than rushing toward the first animal they see.
This guide explains the complete beginner process: checking licenses and tags, understanding mule deer habitat, locating animals from a distance, planning a low-risk stalk, choosing a safe and ethical opportunity, and following recovery, reporting, transport, and meat-care rules. No tactic guarantees success. Weather, migration, hunting pressure, access, fitness, and local conditions can change every hunt.
Quick Answer
To learn how to hunt mule deer, first complete any required hunter education and confirm the current license, tag, unit, season, weapon, bag-limit, land-access, reporting, and transport rules with the official wildlife agency. Scout likely feeding, bedding, water, transition, and migration habitat, then use binoculars or a spotting scope to locate deer before planning a careful approach with favorable wind and terrain. Take only a clearly legal opportunity within your proven ability and with a safe background. Continue below for detailed guidance on preparation, glassing, stalking, safety, recovery, and responsible meat care.
Important Legal and Safety Notice Before You Hunt
Mule deer hunting laws vary by country, state, province, county, management unit, season, land type, deer category, and hunting method. Many mule deer tags are limited, unit-specific, or obtained through an application or drawing. Verify current rules through the official wildlife agency and the manager of the exact land you plan to hunt.
- License and permits: Confirm hunter education, application deadlines, preference or bonus point systems, license, tag, and special-area requirements.
- Tags and reporting: Know the valid species, unit, sex, antler classification, validation sequence, reporting deadline, and check-station rules.
- Season and legal hours: Verify the exact dates and daily hunting hours for the unit and weapon.
- Legal equipment: Check firearm, muzzleloader, archery, crossbow, ammunition, optics, electronics, and equipment restrictions.
- Access: Confirm public-land openings, seasonal closures, wilderness restrictions, vehicle rules, parking, and private-land permission.
- Visibility clothing: Wear blaze orange or other required visibility clothing exactly as local law specifies.
- Safe handling: Treat every firearm as loaded, control the muzzle, keep your finger outside the trigger guard until ready, and identify the target plus everything beyond it. Protect broadheads and follow equivalent bow-safety principles.
- Backcountry planning: Prepare for altitude, steep terrain, heat, cold, limited water, storms, navigation errors, and delayed communication.
Hunter education is designed to develop safe, responsible, conservation-minded hunters. Begin with your local wildlife agency and consult an official resource such as the U.S. Fish and Wildlife Service Hunter Education program when applicable.
Understanding Mule Deer and Their Habitat
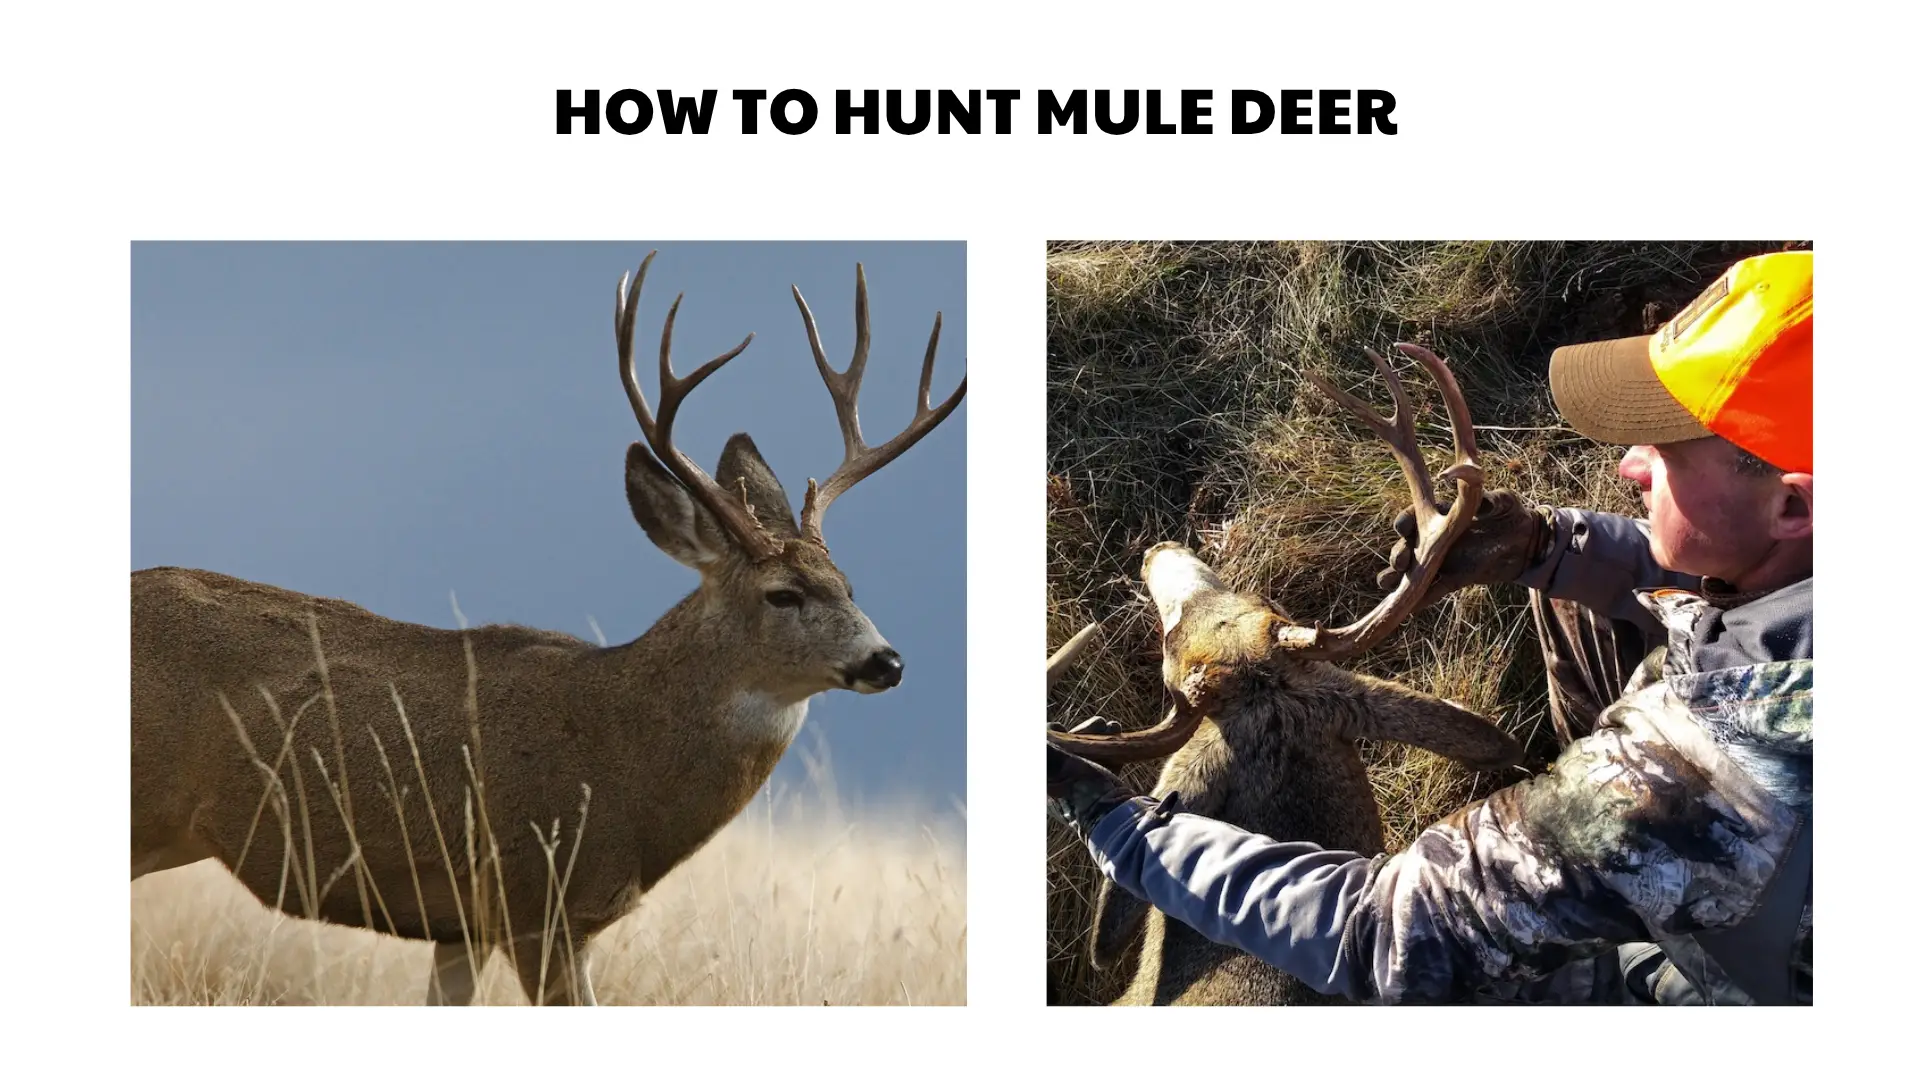
Mule deer, Odocoileus hemionus, are native to western North America. They are named for their large, mule-like ears and are generally identified by a black-tipped tail and a bounding escape gait. Exact appearance and behavior vary among regions and subspecies, so hunters must learn local identification standards.
Open, broken country
Mule deer often use sagebrush, desert scrub, foothills, canyon country, mountain shrub, woodland edges, alpine basins, burns, and agricultural transitions. They may be visible from long distances but difficult to approach because open terrain exposes movement.
Feeding and bedding
Mule deer commonly feed during cooler periods and bed where terrain, shade, wind, vegetation, or visibility provide security. Depending on season and elevation, they may bed below ridgelines, in brush pockets, on shaded slopes, under trees, or in small folds that are difficult to see from one angle.
Water and dry-country patterns
Water can influence movement strongly in arid habitat, but the importance of a specific source changes with temperature, forage moisture, livestock activity, and human pressure. Never assume that hunting directly over water is legal or appropriate; verify local rules and avoid interfering with essential wildlife access.
Seasonal movement and migration
Many mule deer herds shift elevation or migrate between seasonal ranges. Snow, forage, breeding activity, drought, wildfire, roads, and hunting pressure can change where deer are found. Migration timing differs by herd and region, so use current local observations and official agency information.
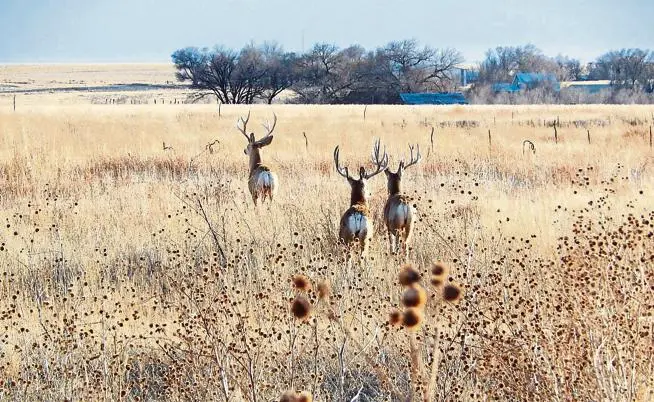
Behavior and visibility
Mule deer may stand and look back after moving, but hunters should never count on that behavior. Their large ears, good vision, and scent awareness help them detect danger. Patient glassing from a concealed position is often more effective than walking continuously through habitat.
Sign beginners should recognize
- Tracks: Cloven-hoof impressions showing direction and repeated use.
- Droppings: Evidence of deer presence; freshness depends on weather and exposure.
- Beds: Flattened areas, often placed to use shade, wind, or terrain security.
- Trails: Routes connecting feeding, bedding, water, and escape cover.
- Browse: Recently clipped shrubs and forbs in active feeding areas.
- Rubs: Bark disturbed by antlered deer during seasonal behavior.
- Observation clues: Ear tips, antler points, a horizontal back line, or a patch of gray-brown hide visible through brush.
For a general official species overview, see the National Park Service mule deer page.
What You Need Before You Start
- Valid license, permits, mule deer tag, and current unit regulations
- Completed hunter education or lawful mentored-hunt authorization
- A legal firearm, muzzleloader, bow, crossbow, or other allowed method
- Repeated practice with the exact hunting equipment
- Binoculars and a stable glassing support
- Spotting scope if useful for the terrain and identification needs
- Rangefinder where legal and used as a decision aid, not a substitute for skill
- Paper map, compass, GPS, or offline hunting map
- Sturdy boots and clothing for heat, cold, wind, and precipitation
- Required blaze orange or other visibility clothing
- Water capacity, water-treatment backup, food, and electrolytes as appropriate
- First aid, blister care, emergency shelter, light, and communication
- Trekking poles if appropriate for steep or loose terrain
- Gloves, clean tools, game bags, and a cooling plan
- Pack frame, cart, legal vehicle access, or planned help for recovery
- A trip plan shared with a responsible person
Open-country hunting can tempt beginners to focus on optics and long-distance equipment. Safety, legal access, physical conditioning, water, navigation, footwear, and a realistic recovery plan are more important than buying premium gear.
How to Hunt Mule Deer: Step-by-Step Guide
Step 1: Check Local Hunting Laws First
Confirm the exact species, unit, tag, season, legal hours, antler or sex classification, bag limit, weapon, ammunition, visibility clothing, access, reporting, and transport rules. Check whether the tag is available over the counter, through a drawing, or only with landowner or special-area authorization.
Review wilderness, motorized travel, road closure, camping, fire, and carcass-transport rules for the land manager. Save official regulations offline and contact the agency when language is unclear.
Step 2: Learn Mule Deer Patterns
Study the relationship between seasonal forage, bedding security, water, slope aspect, elevation, shade, and migration routes. In warm conditions, deer may use cooler aspects or shade. In cold or snowy conditions, they may shift toward wind protection, accessible forage, or lower elevations.
Use current observations rather than assuming one rule works across the West. A productive summer basin may be empty during a late-season hunt.
Step 3: Choose a Legal Hunting Area
Use official unit maps, land-manager maps, access programs, and current closure notices. Identify public parcels, private inholdings, legal roads, trailheads, wilderness boundaries, seasonal vehicle restrictions, and places where retrieval may be difficult.
For private land, obtain permission and clarify dates, parking, gates, livestock, guests, recovery, and vehicle use. Digital ownership layers are planning aids, not final legal proof.
Step 4: Scout Before the Hunt
Use topographic maps and aerial imagery to identify glassing points, benches, burns, brushy draws, water, agricultural edges, escape cover, and likely feeding-to-bedding routes. Field-scout legally and minimize disturbance near secure cover.
Look for fresh tracks, droppings, beds, browse, trails, and direct observations. Record where deer appear at first light, where they move to bed, and how wind or human activity changes the pattern.
Step 5: Prepare Your Gear and Body Safely
Practice with the exact legal equipment, clothing, ammunition or arrows, optics, pack, and field positions you expect to use. Know your personal effective range from repeated, stable practice. Do not extend it merely because open country makes animals look reachable.
Condition gradually for elevation, climbing, descending, and carrying weight. Break in boots, test the pack, and learn how much water you actually use. Never disable safety features or make unsafe weapon modifications.
Step 6: Plan for Wind, Weather, and Entry Route
Choose a glassing point and entry route that avoid skylining your body and sending scent into likely bedding or feeding cover. Account for thermals that may rise as slopes warm and fall as they cool, but monitor actual conditions rather than relying on a fixed rule.
Check heat, cold, snow, rain, lightning, wildfire, road conditions, and water availability. Build turnaround times into the plan so darkness, fatigue, or weather does not force a hazardous exit.
Step 7: Glass Systematically
Begin from a stable, concealed position. Scan likely areas with the naked eye, then use binoculars in a slow grid. Check shade, brush pockets, the base of cliffs, benches, ridge folds, and transitions between feeding and bedding habitat.
Look for small parts rather than whole deer: ear movement, antler tips, legs, a face, or a straight back line. Revisit promising cover as light changes. A spotting scope can help evaluate animals at distance, but it should not be used to claim certainty when identification remains unclear.
Step 8: Plan and Make a Careful Stalk
Before moving, mark the deer’s location with multiple terrain references. Plan a route that uses ridges, draws, vegetation, and wind to remain concealed. Identify intermediate checkpoints and a place to stop and reassess.
Move slowly, avoid loose rock and skylines, and check the wind often. Do not rush into unknown terrain or lose track of roads, partners, private boundaries, or other hunters. If the wind or deer position changes, back out or redesign the approach.
Step 9: Take Only a Safe, Legal, and Ethical Shot Opportunity
Positively identify the animal and confirm that it is legal for the tag, unit, season, sex, and antler rules. Ensure the background is safe, the position is stable, and the opportunity is within your proven field ability.
Open terrain can create pressure to shoot farther than you should. Distance, angle, wind, animal movement, elevation, fatigue, and stability all matter. Never shoot toward a road, trail, home, vehicle, livestock, skyline, person, or unclear movement. Pass whenever doubt remains.
Step 10: Follow Legal Recovery and Reporting Rules
After a shot, maintain safe weapon control, observe the direction of travel, and note landmarks. Follow your hunter education guidance for recovery timing and search procedures. Use legal tracking help when needed and obtain permission before entering private land.
Complete tagging, validation, proof-of-sex, check-station, reporting, and transport steps in the legally required order. Keep confirmation records.
Step 11: Handle the Game Responsibly
Use clean gloves and tools, protect meat from dirt and contamination, and begin cooling it promptly. Warm, dry environments can make cooling especially urgent. Use breathable game bags, shade, air circulation, suitable coolers, or professional processing based on conditions and local law.
Plan recovery before hunting. A mature mule deer may require multiple trips, a pack team, a legal cart, or approved vehicle access. Never overload yourself, take a dangerous shortcut, or waste meat because the retrieval plan was unrealistic.
Best Time, Place, and Conditions for Mule Deer Hunting
Time of day
Mule deer are often easiest to locate while feeding near the beginning and end of legal daylight. Midday can still be productive for finding bedded deer, especially when a hunter glasses shaded cover from a stable position. Legal hunting hours always control.
Early season
Early hunts may occur in high-elevation, desert, or transitional habitat depending on the unit. Deer may use predictable feeding and bedding patterns, but heat, limited water, thunderstorms, and rapid meat cooling are major planning concerns.
Breeding season
During the rut, bucks may travel more and spend time near doe groups. Rut timing varies by herd and latitude. Increased movement does not remove the need for careful identification, safe approach, and conservative shot decisions.
Late season and migration
Snow and declining forage can move deer toward winter range, migration corridors, or lower elevations. Roads and closures may also change. Never assume migration will occur on the same date each year.
Terrain, wind, and visibility
Good glassing conditions often include stable light, manageable wind, and a concealed viewpoint. Strong wind, heat shimmer, fog, snow, rain, or wildfire smoke can reduce identification confidence. If you cannot clearly identify the animal and background, do not act.
Public and private land
Public land may offer extensive habitat but can include private inholdings, vehicle restrictions, wilderness rules, and concentrated pressure near roads. Private land can provide controlled access only with permission. Current sign, lawful entry, and a realistic retrieval route matter more than ownership type alone.
Helpful Tips for Better Results
- Glass before walking: Spend enough time studying a basin or slope before exposing yourself to it.
- Use a stable rest: A tripod, trekking pole support, or pack can reduce eye strain and reveal small movement.
- Mark bedded deer carefully: Use several terrain references because the animal may disappear once you change position.
- Avoid skylines: Travel below ridges when practical and safe so your silhouette is less visible.
- Carry more water than a casual hike: Adjust for heat, elevation, distance, and the possibility of a longer recovery.
- Set a conservative personal range: Base it on repeatable field practice, not ideal range conditions.
- Plan the pack-out first: Know the legal route, distance, temperature, help, and cooling method before beginning a stalk.
Common Mistakes to Avoid
Mule deer hunting can look simple when animals are visible from far away. The difficult parts are often access, identification, wind, terrain, stability, physical effort, and recovery.
- Applying for or buying a tag without understanding the exact unit and restrictions
- Using outdated closure, road, or ownership information
- Walking through habitat before glassing it carefully
- Glassing too quickly or only scanning open ground
- Skylining yourself on ridges
- Ignoring changing thermals and wind during a stalk
- Underestimating heat, altitude, water needs, or steep descents
- Carrying too much gear while omitting first aid, navigation, or emergency shelter
- Extending shooting distance beyond proven ability
- Taking a shot without a stable position or safe background
- Failing to mark the animal’s location and last direction of travel
- Starting a stalk without a legal, safe retrieval and cooling plan
- Crossing private land, closed roads, or restricted areas without authorization
Troubleshooting Common Problems
| Problem | Possible Cause | What to Do |
|---|---|---|
| You are not finding mule deer | Wrong elevation, seasonal shift, pressure, poor glassing angle, old sign, or unsuitable habitat | Check current agency information, change glassing points, inspect different aspects and elevations, and verify fresh sign. |
| You see deer but lose them | Weak terrain references, changing light, hidden folds, or moving too soon | Mark several landmarks, note distance and direction, watch longer, and recheck from the original position. |
| The stalk keeps failing | Wind shifts, skylining, noisy footing, rushed movement, or poor route choice | Back out safely, redesign the route, wait for better conditions, or abandon the stalk. |
| Heat shimmer makes identification difficult | Warm ground and long viewing distance distort the image | Glass earlier, move to a different angle, reduce magnification, or wait until conditions improve. |
| Other hunters are in the basin | Popular access, visible deer, road concentration, or opening-day pressure | Maintain separation, communicate courteously, avoid overlapping fields of fire, and choose another legal area if needed. |
| Property or unit boundaries are unclear | Outdated app data, private inholdings, poor markers, or complex unit lines | Stop hunting that area and verify with official maps, the agency, or the landowner. |
| Weather becomes unsafe | Lightning, snow, heat, wildfire, flooding, high wind, or poor roads | Secure equipment and leave by the safest planned route. Return only when conditions are appropriate. |
| Equipment or optics fail | Loose hardware, damaged tripod, weak battery, fogging, or poor maintenance | Use backups only if safe. Do not improvise risky repairs; end the hunt when essential equipment is unreliable. |
| You feel pressured to take a long shot | Open terrain, excitement, limited opportunities, or comparison with others | Return to your proven personal limit. Reposition, wait, or pass. |
| Recovery or pack-out looks unsafe | Steep terrain, darkness, heat, fatigue, distance, or insufficient help | Follow legal recovery rules, seek qualified help, make controlled trips, and never overload yourself. |
Ethical Mule Deer Hunting and Conservation
Ethical mule deer hunting requires more than meeting minimum legal standards. It includes respecting migration routes, winter range, water, fragile habitat, other recreationists, private property, and the limits of your own skill.
- Obey seasons, unit boundaries, tag limits, access restrictions, and reporting rules.
- Practice enough to know your effective range and pass uncertain opportunities.
- Avoid disturbing wintering or migrating deer outside lawful hunting activity.
- Do not block water sources, roads, trails, gates, or wildlife movement.
- Plan recovery and cooling so the harvest is not wasted.
- Respect landowners, livestock, other hunters, hikers, and nearby communities.
- Use established access responsibly and leave the land cleaner than you found it.
- Support habitat conservation, research, hunter education, and science-based management.
Public-land hunting opportunities depend on lawful, environmentally responsible use. The Bureau of Land Management hunting and fishing page provides general information, while state or provincial wildlife agencies control species seasons and permits.
When to Get More Training or Professional Guidance
Seek additional instruction when you have never safely handled the chosen firearm or bow, have not completed hunter education, cannot explain the tag or unit rules, do not understand land boundaries, or cannot demonstrate stable field shooting within a conservative distance.
Professional help is also valuable for backcountry navigation, altitude and heat preparation, wilderness travel, optics use, pack fitting, legal recovery, meat care, and transport restrictions.
Reliable sources include:
- Official hunter education courses
- State, provincial, territorial, or national wildlife agencies
- Certified firearm, archery, and outdoor skills instructors
- Experienced ethical mule deer mentors
- Local conservation organizations
- Reputable hunting clubs with supervised programs
- Properly licensed guides or outfitters where applicable
After the Hunt: Follow-Up, Gear Care, and Learning
Unload, inspect, clean, and store firearms according to law and manufacturer guidance. Protect broadheads, inspect strings and arrows, dry clothing, clean boots, check packs and trekking poles, recharge electronics, and clean optics with appropriate materials.
Complete all required harvest reports and retain confirmation records. Follow tagging, proof-of-sex, disease-management, transport, and processing rules. Cool meat promptly and use professional processing when sanitary or temperature control is uncertain.
Record the following:
- Date, unit, elevation, and legal hunting window
- Temperature, wind, precipitation, visibility, and snow conditions
- Glassing point, observation angle, and time spent glassing
- Fresh tracks, beds, browse, water use, and direct sightings
- Feeding, bedding, travel, and escape direction
- Stalk route, wind changes, and where the approach failed or succeeded
- Water use, fatigue, foot problems, and pack performance
- Skills, equipment, or legal questions to address before the next hunt
Recommended Mule Deer Hunting Gear and Tools to Consider
You do not need the most expensive gear to hunt responsibly. Choose equipment based on current law, hunting method, unit, terrain, weather, distance from access, physical ability, safety needs, and budget.
- A legal hunting weapon or method that fits the user and has been practiced with safely
- Binoculars with a stable support
- Spotting scope for large terrain when it improves identification
- Rangefinder where legal
- Offline maps, paper backup, compass, GPS, and emergency communication
- Supportive boots, moisture management, insulation, rain protection, and required visibility gear
- Water capacity, treatment backup, food, and electrolytes where appropriate
- First aid, blister care, emergency shelter, headlamp, and spare power
- Trekking poles and a properly fitted pack for difficult terrain
- Gloves, clean tools, breathable game bags, and cooling supplies
- A lawful pack-out system and enough help for the distance and temperature
Inspect borrowed or used equipment before relying on it. No optic, app, rifle, bow, camouflage pattern, or other product guarantees success.
Final Thoughts
Learning how to hunt mule deer means building a careful process: verify the tag and unit, complete hunter education, practice with legal equipment, condition for the terrain, secure lawful access, understand seasonal habitat, glass patiently, plan the stalk around terrain and wind, and pass any opportunity that is not clearly safe, legal, and ethical.
Prepare recovery, reporting, transport, cooling, and meat care before leaving the trailhead. Match methods and equipment to local regulations, terrain, weather, demonstrated skill, and conservation responsibilities. Patience, physical preparation, and honest limits are more valuable than any promise of guaranteed success.
Frequently Asked Questions About How to Hunt Mule Deer
1. How long does it take to learn how to hunt mule deer?
A beginner can learn the legal and safety basics through hunter education, practice, and mentored field experience before a first season. Consistent skill in glassing, navigation, stalking, wind reading, and recovery usually develops over multiple hunts. Progress should be measured by safe decisions, not only by harvest.
2. What should a beginner do first before hunting mule deer?
Start with the official wildlife agency for the exact state, province, territory, or country. Learn the application process, unit system, license, tag, season, weapon, reporting, transport, and access rules. Then complete training and build a realistic fitness, practice, and scouting plan.
3. Do I need a special tag to hunt mule deer?
Most regulated systems require a species-appropriate deer tag, and many mule deer units use limited drawings or unit-specific permits. Requirements differ by jurisdiction, residency, season, sex, age class, and weapon. Verify the exact tag before applying or hunting.
4. Is hunter education required for mule deer hunting?
Many jurisdictions require approved hunter education for first-time hunters or people born after a specified date. Some offer supervised apprentice programs. Check the current official rules rather than assuming an exemption.
5. Can a complete beginner hunt mule deer alone?
It may be legal, but a trained and ethical mentor can greatly improve safety, navigation, field judgment, recovery planning, and meat care. Beginners entering remote or steep country should strongly consider experienced help.
6. How physically fit should I be for mule deer hunting?
Fitness needs depend on elevation, distance, pack weight, weather, and access. Build walking, climbing, descending, balance, and pack-carrying capacity gradually. Stop and seek medical advice when health conditions make exertion or altitude risky.
7. How much does it cost to start mule deer hunting?
Costs vary with tags, applications, travel, training, equipment, optics, access, processing, and whether gear is borrowed. Prioritize legal requirements, safety, footwear, navigation, water, practice, and recovery planning before premium optics or accessories.
8. What basic gear does a mule deer hunter need?
Typical essentials include legal tags and equipment, required visibility clothing, binoculars, maps, navigation backup, water, first aid, weather layers, sturdy boots, light, communication, game bags, gloves, and a pack-out plan. Exact needs depend on the unit and terrain.
9. Do I need a spotting scope to hunt mule deer?
Not always. Good binoculars can be enough in smaller terrain, while a spotting scope may help identify animals across large basins. Use stable optics and never let magnification create false certainty about legality or distance.
10. What binocular magnification is best for mule deer hunting?
There is no single best choice. Higher magnification can reveal detail but is harder to hold steady and may reduce field of view. Choose optics you can use comfortably and pair them with a stable support when practical.
11. Do I need a rangefinder for mule deer hunting?
A rangefinder can help estimate distance where legal, but it does not determine whether a shot is ethical. Stability, wind, angle, visibility, animal movement, and your proven ability still control the decision.
12. Should a beginner use a firearm or a bow for mule deer?
Use a legal method that you can operate safely and consistently after qualified instruction. Firearm and archery seasons have different rules, access, effective ranges, practice needs, and recovery challenges. Choose based on law and demonstrated skill.
13. What firearm safety rules matter most in mule deer country?
Treat every firearm as loaded, control the muzzle, keep your finger outside the trigger guard until ready, and identify the target and everything beyond it. Unload before entering vehicles, crossing difficult obstacles, or handling equipment in an unsafe position.
14. What bowhunting safety rules should mule deer hunters know?
Inspect the bow and arrows, keep broadheads covered during transport, practice from realistic positions, and know your personal effective range. Never draw toward people, roads, livestock, buildings, vehicles, or unclear movement.
15. How much practice is needed before a mule deer hunt?
Practice until operation is automatic and safe and you can repeat accurate results from stable field positions while wearing hunting clothing. Include kneeling, sitting, supported, uphill, and downhill positions where safe. Do not expand distance unless results are consistently repeatable.
16. What is an ethical shooting distance for mule deer?
There is no universal distance. Your limit is the shortest distance allowed by law, equipment, conditions, and your proven field ability. Wind, angle, fatigue, stability, and animal movement may require a much shorter distance than your range performance suggests.
17. How do I know whether a mule deer is legal?
Study official identification rules for species, sex, antler class, tag, unit, and season. Mule deer and white-tailed deer may overlap in some areas, and legal definitions can be specific. Do not act when identification is uncertain.
18. When is mule deer hunting season?
Season dates vary by jurisdiction, unit, weapon, tag, and herd objective. Many tags are tied to specific dates and areas. Use the current official regulation guide and check emergency changes before every hunt.
19. What is the best time of day to hunt mule deer?
Early and late legal daylight often provide feeding movement and better glassing conditions. Midday can be useful for locating bedded deer. Weather, pressure, season, and local behavior matter more than a universal schedule.
20. What weather is best for mule deer hunting?
Manageable wind, clear visibility, and safe travel conditions make glassing and stalking easier. Cold fronts, snow, heat, rain, or wind can change movement, but no weather guarantees success. Safety and identification confidence come first.
21. How does wind direction affect a mule deer stalk?
Wind can carry human scent toward the animal and can also affect shooting stability. Plan an approach that keeps scent away from the deer, check changes caused by terrain and thermals, and abandon the stalk when conditions become unreliable.
22. What are thermals in mule deer hunting?
Thermals are local air movements influenced by slope heating and cooling. Air may rise on warming slopes and sink as they cool, but terrain and weather can create exceptions. Observe actual wind throughout the stalk.
23. Where do mule deer usually live?
Mule deer use varied western habitats including desert scrub, sagebrush, foothills, canyon country, woodland edges, mountain shrub, alpine basins, and agricultural transitions. Seasonal range and migration can move them far from earlier locations.
24. What mule deer sign should beginners learn first?
Learn tracks, droppings, beds, trails, browse, water use, rubs, and direct observation clues. Fresh clusters of sign connected to food, cover, and terrain are more useful than one isolated track.
25. How can I tell whether mule deer tracks are fresh?
Track freshness depends on soil, wind, sun, rain, and other traffic. Sharp edges, displaced moisture, or undisturbed debris may help, but compare tracks with known recent marks in the same ground rather than relying on one clue.
26. Where do mule deer bed?
Bedding locations vary with shade, wind, security, visibility, temperature, and season. Deer may bed below ridges, in brush pockets, under trees, on benches, or in small terrain folds. Glass from several angles before assuming an area is empty.
27. How do I scout for mule deer before the season?
Use official maps, topography, aerial imagery, migration information, legal access points, and field observations. Identify feeding areas, bedding terrain, water, glassing points, travel routes, and recovery options. Avoid unnecessary disturbance.
28. Can trail cameras be used for mule deer scouting?
Rules vary and may restrict timing, transmission, placement, bait association, or use during hunting seasons. Confirm current regulations and land-manager rules before placing any camera.
29. Is baiting mule deer legal?
Baiting laws vary widely and may change due to disease or fair-chase concerns. Do not place feed, minerals, salt, or attractants until the official wildlife agency confirms the exact activity is legal.
30. How do I find public land open to mule deer hunting?
Use the official wildlife agency and land manager maps. Verify unit boundaries, parcel status, season, parking, road closures, wilderness rules, special permits, and private inholdings. Public ownership does not automatically mean unrestricted hunting access.
31. Is public land harder than private land for mule deer?
Public land may involve more pressure, remote access, complex boundaries, and vehicle restrictions. Private land may offer controlled access but requires permission and adherence to landowner conditions. Scouting and lawful access matter more than ownership alone.
32. How do I ask for permission to hunt private land?
Contact the landowner well before the season, explain the request clearly, and accept refusal respectfully. Discuss dates, parking, gates, livestock, guests, recovery, vehicles, and cleanup. Written permission may be required.
33. What should I do when a boundary is unclear?
Do not hunt the uncertain area. Check official maps, land records, signs, and permission documents. Mapping apps can contain errors, so contact the agency or landowner before returning.
34. How do I choose a good glassing point?
Choose a stable, concealed position that overlooks likely feeding, bedding, and transition habitat without skylining you or sending scent into the area. Confirm safe access and an exit route.
35. How long should I glass one area?
There is no fixed time. Large or brushy terrain may require repeated slow scans as light changes. Glass long enough to inspect every likely pocket, then revisit areas where only part of an animal may be visible.
36. How do I glass mule deer effectively?
Use a slow grid, stable support, and short eye breaks. Scan with the naked eye first, then binoculars, and use a spotting scope for detail. Look for ears, antlers, legs, a back line, or movement rather than only complete deer.
37. How do I mark a bedded mule deer before stalking?
Use several permanent terrain references such as rock shapes, trees, drainage junctions, and ridge features. Note direction and distance and take a reference image where legal. Recheck from the original point before leaving.
38. How close should I stalk before taking a shot?
Move only as close as needed to create a stable, safe, legal opportunity within your proven ability. Terrain and wind may allow a closer approach, but do not rush or enter unsafe ground merely to reduce distance.
39. Why do mule deer keep spotting me?
Common causes include skylining, fast movement, poor concealment, noise, scent, or approaching from an exposed angle. Use terrain, move slowly, remain below ridges, and wait when the deer is alert.
40. What should I do if other hunters are nearby?
Maintain safe separation, make your presence visible when appropriate, avoid overlapping fields of fire, and communicate courteously. Choose another legal route or basin when safety is uncertain.
41. Can I shoot at a mule deer on a skyline?
No. A skyline provides no confirmed backstop, so a missed or passing projectile may travel far beyond the animal. Reposition or pass.
42. What makes a mule deer hunting shot ethical?
The animal must be clearly identified and legal, the background safe, the position stable, and the distance within your proven ability. The angle and presentation should support a clean outcome and realistic recovery. Pass when any factor is uncertain.
43. What should I do immediately after taking a shot?
Maintain safe weapon control, watch the animal’s direction, note landmarks, and control your emotions. Follow hunter education guidance for the appropriate recovery process and avoid rushing into hazardous terrain.
44. How long should I wait before tracking a mule deer?
There is no single waiting time for every situation. Base the decision on what you observed, equipment, weather, terrain, legal hours, and training. Seek experienced or official guidance when uncertain.
45. Can I cross private land to recover a mule deer?
Do not enter private land without permission unless the law provides a specific process. Contact the landowner and, when appropriate, a conservation officer or wildlife agency.
46. What if I cannot find the mule deer?
Return to the last confirmed location, mark the route, and search methodically without destroying all sign. Use legal assistance such as an experienced tracker or approved dog where allowed, and follow reporting rules.
47. When should I tag a harvested mule deer?
Follow the exact local sequence. Some jurisdictions require immediate tagging or electronic validation before moving the animal. Read the instructions before the hunt and carry the required materials.
48. Do I have to report a mule deer harvest?
Many wildlife agencies require reporting within a stated period. Methods may include an app, website, phone system, check station, or inspection. Keep the confirmation number or record.
49. How should mule deer meat be cared for in warm weather?
Use clean tools and gloves, protect meat from dirt and insects, create airflow, use breathable game bags, and begin cooling promptly. Plan shade, ice, refrigeration, or professional processing before the hunt.
50. How do I pack out a mule deer safely?
Know the distance, elevation change, weather, legal route, and available help. Use a fitted pack and manageable loads, make multiple trips when needed, and avoid descending loose or steep terrain while overloaded.
51. Can I transport mule deer across a state or provincial border?
Disease-management rules may restrict which carcass parts can cross boundaries and how tags or proof of sex remain attached. Check both the origin and destination rules before travel.
52. What should I do with optics and gear after the hunt?
Unload and secure weapons, cover broadheads, dry clothing, clean boots, inspect packs, recharge electronics, and clean optics with suitable tools. Repair failures before the next trip.
53. How can I improve after my first mule deer season?
Keep notes on glassing points, wind, elevation, weather, sightings, stalk routes, water use, fatigue, and decisions. Continue field-position practice, improve fitness gradually, and review the plan with an ethical mentor.
54. How does regulated mule deer hunting support conservation?
In many systems, license and permit revenue supports management, habitat, research, access, education, and enforcement. Conservation benefits depend on lawful harvest, accurate reporting, responsible behavior, and habitat protection.
55. When should a beginner hire a guide or seek professional help?
Seek qualified help when regulations, terrain, navigation, weapon safety, physical demands, recovery, or meat care exceed your experience. Verify that the guide or instructor is properly licensed and reputable.
Read more: How to Hunt Whitetail Deer: A Complete Beginner-Friendly Guide